If the Message <Replace the toner cartridge. (XXX)> Appears while Copying or Printing
16-Dec-2011
8200280100
Issue
A copy or print job is interrupted and the message
Cause and Solution
If the toners are running out or they are not installed properly, the message <Replace the toner cartridge. (XXX)> appears on the display. Replace the toner cartridges of the color indicated in "XXX."
<Replace the toner cartridge. (Black)>: Replace the black toner cartridge.
<Replace the toner cartridge. (Yellow)>: Replace the yellow toner cartridge.
<Replace the toner cartridge. (Cyan)>: Replace the cyan toner cartridge.
<Replace the toner cartridge. (Magenta)>: Replace the magenta toner cartridge.
If the message is displayed while copying or printing, the job is interrupted when the machine finishes printing on the paper that has been supplied.
Even if you change the color mode from the full color mode to black and white mode, you cannot continue printing without replacing the empty toner cartridge.
If any of the following messages appears, replace the toner cartridge of the indicated color with a new one.
<Replace the toner cartridge. (Black)>: Replace the black toner cartridge.
<Replace the toner cartridge. (Yellow)>: Replace the yellow toner cartridge.
<Replace the toner cartridge. (Cyan)>: Replace the cyan toner cartridge.
<Replace the toner cartridge. (Magenta)>: Replace the magenta toner cartridge.
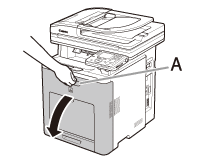
1. Open the front cover by using the handle (A).
NOTE
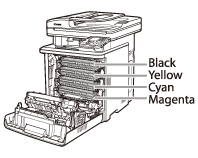
The toner cartridges are installed in order of black, yellow, cyan, and magenta from the top as shown in the figure.
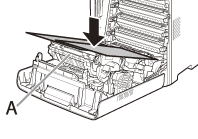
2. Place paper (A4 size paper is recommended) on the transfer belt of the delivery feeder unit (A) as shown in the figure and be sure that they do not move out of place.
CAUTION
- When installing or removing the toner cartridges, be sure to place paper on the transfer belt of the delivery feeder unit to protect the belt.
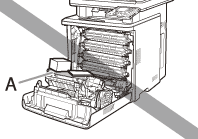
- Do not place any object on or touch the transfer belt (A) of the delivery feeder unit. You do not need to manually clean the transfer belt even when it is stained by toner, as the delivery feeder unit has a self cleaning function for the belt. Breaking the delivery feeder unit or damaging the transfer belt may result in misfeeds or deterioration in print quality.

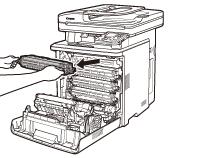
3. Hold the blue tabs on the both sides of toner cartridge, and pull it horizontally.
CAUTION
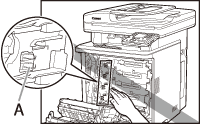
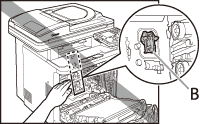
Do not touch the high-voltage contact (A) or the electrical contacts (B), as this may result in damage to the printer.
4. Take the new toner cartridge out of the protective bag after taking it out of the package.
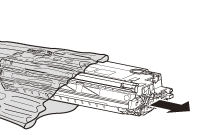
There is a cut near the arrow on the protective bag, so you can open it by hand. However, if you cannot open it by hand, use scissors to open the protective bag so as not to damage the toner cartridge.
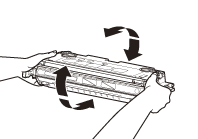
5. Gently rock the toner cartridge several times to evenly distribute the toner inside.
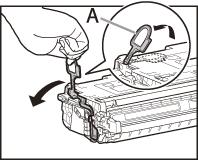
6. Place the toner cartridge on a flat surface, fold back the tab of the sealing tape (A) located at left side of the toner cartridge.
7. Remove the sealing tape (approx. 48cm long) gently by hooking your fingers into the tab and pulling it out straight in the direction of the arrow.
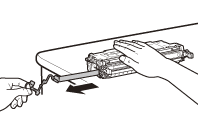
IMPORTANT
Do not pull the seal out at an angle. The sealing tape may be cut off at midpoint and cannot be pulled out completely.
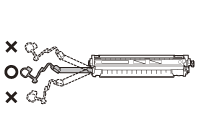
CAUTION
Do not thrust the drum protective shutter (A) when you pull out the sealing tape.
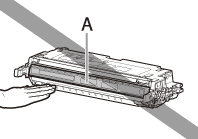
CAUTION
- If the sealing tape is pulled out forcefully or stopped at midpoint, toner may spill out. If the toner gets into your eyes or mouth, wash them immediately with cold water and consult a physician.
- If toner is adhered to the removed seal, be careful not to dirty your hands or clothing by touching it.
- If your hands or clothes get dirty from touching the toner, wash them immediately in cold water. Do not use hot water. Doing so may cause the toner to set permanently.
8. Hook your finger into the tab and remove the packing materials (A) located at right side of the toner cartridge.
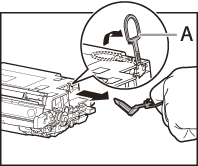
9. Hold the toner cartridge properly by the blue tabs on the both sides with the arrowed side facing up.
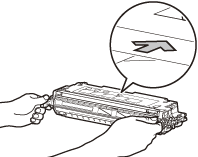
CAUTION
Do not hold the toner cartridge in a manner that is not directed in this procedure.
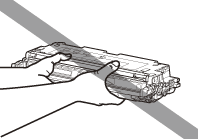
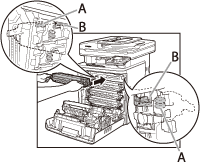
10. Align (A) of the toner cartridge that you want to replace with the slots (B) to which the label of the same color is attached, then insert the cartridge until it stops.
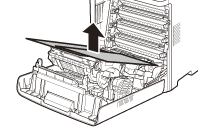
11. After removing all the packing materials on the each toner cartridges and installing the cartridges, remove the paper on the transfer belt of the delivery feeder unit.
CAUTION
When removing the paper, be careful not to touch or damage the transfer belt of the delivery feeder unit.
12. Close the front cover.

CAUTION
- Be careful not to get your fingers caught.
- If the front cover does not close properly, do not force it to close. Open the cover and make sure the toner cartridge is properly set in the machine.