Solution
To scan films into an application program, you can start ScanGear CS from within the program.
In the Simple Mode, there are only a few simple procedures.
1.Position the film guide on the document glass of the scanner, set the film in the film guide and place the film adapter unit on the film
IMPORTANT
- To scan monochrome films, start ScanGear CS from an application program and use the Advanced Mode to scan.
2.Close the document cover
3.Start ScanGear CS from within the application program
<PhotoStudio is used in this example>
Windows
1.Click the [Start] menu and select [(All) Programs], followed by [ArcSoft PhotoStudio 5.5] and [PhotoStudio 5.5].
2.Click the [File] menu and select [Acquire].
Macintosh
1.Double-click the [PhotoStudio] alias on the desktop or open the [Applications] folder, and double-click the [PhotoStudio] folder, followed by the [PhotoStudio] icon.
2.Click the [File] menu and select [Acquire].
The ScanGear CS window will display.
4.If ScanGear CS is in the Advanced Mode or in the Multi Scan, click the [Simple Mode] to display the Simple Mode window
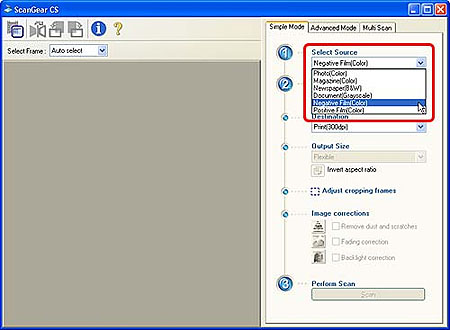
5.Select the [Select Source]
You can select from the following options:
Negative Film (Color) / Positive Film (Color)
6.Click the [Preview] button
Thumbnail of a frame will display.
REFERENCE
- To preview another frame, move the film adapter unit over and click the [Preview] button again.
IMPORTANT
- If the previewed image does not display correctly, adjust the position of the film in the film guide and click the [Preview] button again.
- Calibrate the scanner if the following message appears: "Recommend executing a calibration command to keep higher image quality."
7.Select the [Destination]
Select a Destination setting: either Print (300 dpi) or Image display (150 dpi). The Output Size options in the next step will vary according to the Destination setting selected.
8.Select the [Output Size]
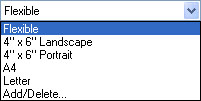
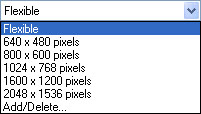
You can select from the following options.
| If "Print (300dpi)" is selected in step 7 | If "Image display (150dpi)" is selected in step 7 |

| 
|
* Selecting Flexible enlarges 35 mm film to the photo size (4"x6").
* Selections Other than Flexible:
- When the Print (300dpi) option is selected, you can set the output size to match standard paper formats. The scan area is enlarged or reduced to fit the output to the specified paper size. You can set your own output sizes with the [Add/Delete] option.
- When you select Image display (150 dpi), you can select the Output Size according to its pixel dimensions (pixels are the picture elements used to display an image on a monitor). Since the pixel dimensions correspond to the dimensions of standard computer displays (monitors), you can use the images as "wallpaper" without adjustment. They also correspond to the dimensions to which digital camera images can be set, allowing you to manage and organize your scanned images along with digital camera images. You can specify the pixel dimensions of customized output sizes with the [Add/Delete] option.
REFERENCE
- Only the settings you add with the [Add/Delete] option can be deleted. The preset options cannot be deleted.
9.Set the Image corrections categories as required
10.Click the [Scan] button
REFERENCE
- Move the film adapter unit over and repeat the procedures listed above (Steps 6-10) to scan additional frames.
11.After the scan is complete, click the close box Windows or Macintosh to close ScanGear CS
The image will display in the application program.
12.Save the displayed image
13.When you have finished scanning film, put the protective cap back on the film adapter unit, film guide and scanned film
IMPORTANT
- Always put the protective cap back on the film adapter unit when it is not in use. Dust, dirt or scratches on the light panel of the film adapter unit may affect image quality or damage the film.
- Film may be damaged if it is left on the document glass for extended periods of time.


