Solution
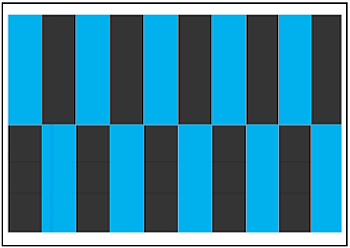
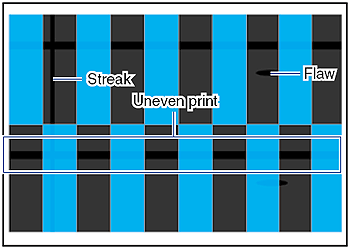
When any print defects such as those in
[Print Defect Samples] appears, perform the following procedures in number order to solve the problem.
1. Clean the inside of the printer, then perform calibration.
2. Print Test Chart 1.
3. Print Test Chart 2.
IMPORTANT
1. Cleaning the Inside of the Printer
If any print defects as those in
[Print Defect Samples] appears on the printout result, clean the inside of the printer and perform calibration using the following procedure.
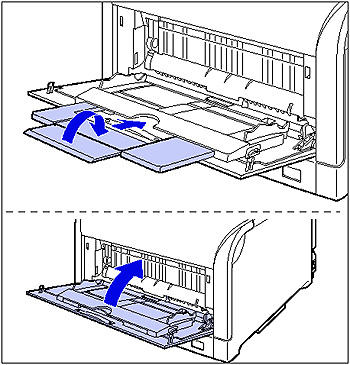
1. If you are using the multi-purpose tray, close it.
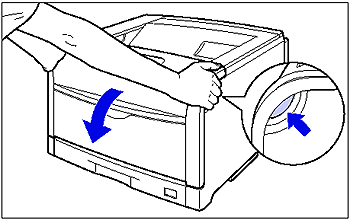
2. Open the front cover.
While pressing the lever on the right side of the front cover, open the front cover toward you.
IMPORTANT
Before opening the front cover, make sure that the multi-purpose tray and the paper cassette of the printer are closed.
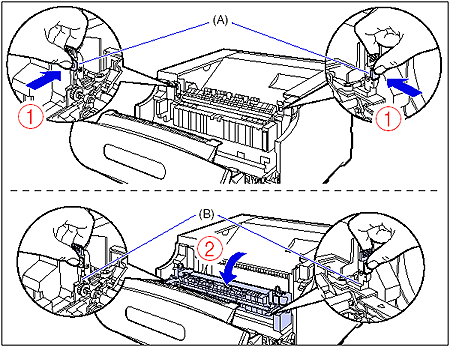
3. Tilt the fixing unit toward you.
While pressing the green lock release buttons (A) on the left and right side of the fixing unit (1), hold the tabs (B) and tilt the fixing unit toward you (2) as shown in the figure.
4. Open the top cover.
Press the blue lock release button of the top cover.
While holding the lever of the top cover, open the top cover.
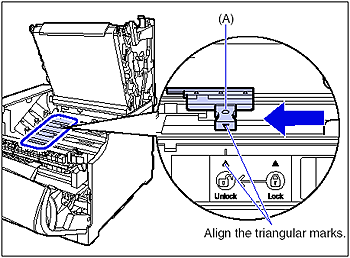
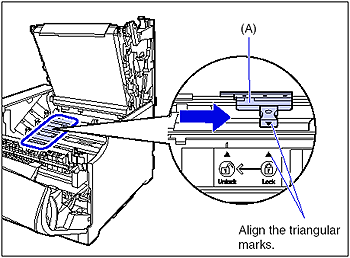
5. Slide the blue lock release lever (A) of all the drum cartridges to the position of "

" to release the locks of the drum cartridges.
Slide the lock release lever until the triangular mark on the lock release lever aligns with the triangular mark on the label.
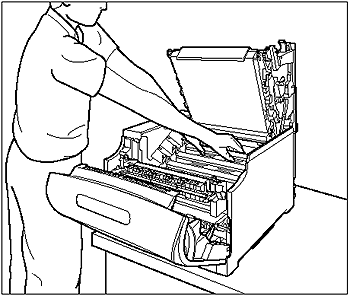
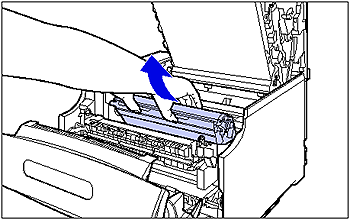
6. Remove all the drum cartridges.
Remove the drum cartridge by holding the blue tab (A) as shown in the figure.
IMPORTANT
Place the removed drum cartridge into the original protective bag immediately.
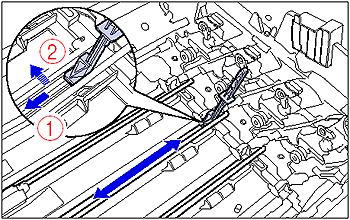
7. Remove the cleaning brush on the right side of the inside of the printer.
Raise the rear end of the cleaning brush (1), pull it out sideways (2).
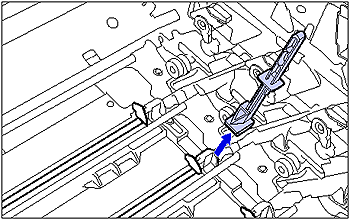
8. Insert the cleaning brush into the slot.
Insert the cleaning brush so that the triangular mark (A) on the brush aligns with that on the printer.
9. Slide the cleaning brush from side to side along the slot several times.
When you slide the cleaning brush (1), the cover opens automatically (2).
10. Pull the cleaning brush out of the slot.
Repeat Step 8 to 10 to clean the slots of each color.
11. Put the cleaning brush back to its original position.
12. Before installing the drum cartridge, align the triangular mark on the lock release lever (A) with the triangular mark of "

" on the label as shown in the figure.
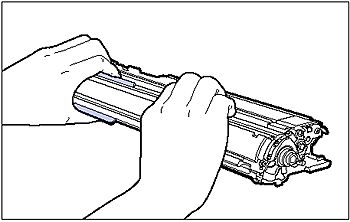
When installing the drum cartridge, hold the blue tabs as shown in the figure.
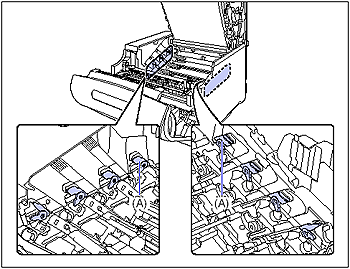
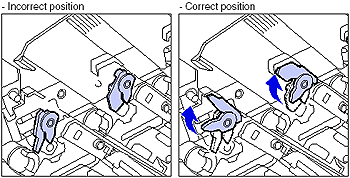
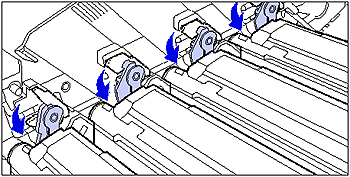
13. Make sure that the levers (A) near the drum cartridge guides on the both sides are in the proper position as shown in the figure.
If the levers are not in the proper position, the drum cartridges cannot be installed. Raise the levers to the proper position as shown in the figure.
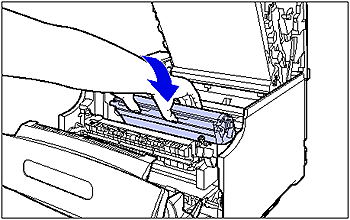
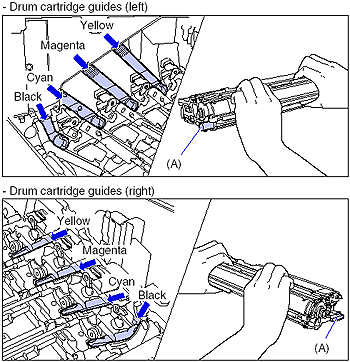
14. Install the drum cartridge in the printer.
Insert the drum cartridge firmly until it touches the back of the printer.
Insert the projections (A) on each side of the drum cartridge into the drum cartridge guides as shown in the figure.
IMPORTANT
Insert the drum cartridges firmly until they touch the back of the printer. If the drum cartridges are not installed firmly, this may result in poor print quality.
15. Make sure that the levers near the drum cartridge guides on the both sides are in the proper position as shown in the figure.
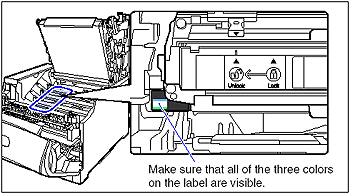
16. Make sure that the labels on the projections of the drum cartridge are visible.
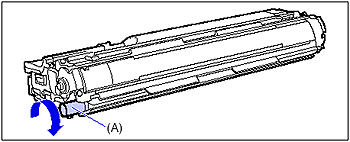
If you cannot see any of the three colors on the label from the front, take out the drum cartridge once, turn the projection (A) in the direction of the arrow until it clicks and stops, and then reinstall the cartridge.
17. Slide the blue lock release lever (A) to the position of "

" to lock the drum cartridge.
Slide the lock release lever until the triangular mark on the lock release lever aligns with the triangular mark on the label.
18. Close the top cover.
Close the top cover of the printer while holding it by the lever (A) gently.
If you close the top cover forcefully, the ITB unit cover (B) may not move back to the original position, and this may result in damage to the printer.
By pressing the portion indicated "PUSH", close the top cover firmly until it cannot be pressed down any further as shown in the figure.
19. By holding the lever as shown in the figure, make sure that the top cover does not open.
20. While holding the tabs (A), move the fixing unit back to its original position (1), and then press the tabs on the both sides as shown in the figure (2).
21. Close the front cover.
While supporting the front cover (1), push and close the front cover with both hands as shown in the figure (2).
After cleaning the inside of the printer, perform calibration using the following procedure.
22. Make sure that the printer is online.
If the printer is not online, press [Online].
24. Select CALIBRATION using [

] and [

], then press [OK].
Calibration is performed. The Ready indicator and Online indicator blink during the calibration.
After completing the calibration, the message <00 READY> appears in the display.
NOTE
Calibration takes approximately 50 seconds.
25. After performing calibration, print the print data in which print defect appeared again.
If the print defect problem is solved, you can use the printer as normal. If the print defect problem is not solved, go on to perform "Printing Test Chart 1" below in this page.
Print Test Chart 1 when checking if the poor print quality is due to any problem in the drum cartridges. Print Test Chart 1 using the following procedure.
NOTE
Test Chart 1 is printed on 8 sheets of A4 size paper. Load A4 size paper.
1. Make sure that the printer is online.
If the printer is not online, press [Online].
3. Select TEST CHART 1 using [

] and [

], then press [OK].
4. Check if any flaws, unevenness, or streaks appear on the printed Test Chart 1.
- When problems (flaws, uneven prints, streaks) do not appear on the printed paper
If there is no print defect (flaws, uneven print, or streaks) appearing on every sheet of Test Chart 1, go on to perform "Printing Test Chart 2" below in this page.
- When problems (flaws, uneven prints, streaks) appear on the printed paper
If you find any print defects (flaws, uneven print, or streaks) appearing on the sheets of all the colors of Test Chart 1, and if all of those are at the same areas or their features are all the same, go on to perform "Printing Test Chart 2" below in this page.
If you find any print defects (flaws, uneven print, or streaks) appearing only on the sheets of certain colors of Test Chart 1, and if all of those are at the same areas or their features are all the same, apply the following remedies.
- If white streaks appear on Test Chart 1: Contact your local authorized Canon dealer.
- If white streaks do not appear on Test Chart 1: Replace the drum cartridge of the color in which the print defect (flaws, uneven print, or streaks) appeared. For details on the procedure for replacing the drum cartridges, see
[Replacing Drum Cartridges]. If the print defect problem is not solved even after replacing the drum cartridge, contact your local authorized Canon dealer.
Print Test Chart 2 when checking if the poor print quality is due to any problem in the fixing unit. Print Test Chart 2 using the following procedure.
NOTE
Test Chart 2 is printed on a sheet of A4 size paper. Load A4 size paper.
1. Make sure that the printer is online.
If the printer is not online, press [Online].
3. Select TEST CHART 2 using [

] and [

], then press [OK].
4. Check if any flaws, unevenness, or streaks appear on the printed Test Chart 2.
- When problems (flaws, uneven prints, streaks) do not appear on the printed paper
If there is no print defect (flaws, uneven print, or streaks) appearing on Test Chart 2, there is a possibility that some problem has occurred in the printer. Contact your local authorized Canon dealer.
- When problems (flaws, uneven prints, streaks) appear on the printed paper
If there are any print defects (flaws, uneven print, or streaks) appearing on Test Chart 2, replace the fixing unit. For details on the procedure for replacing the fixing unit, see
[Replacing the Fixing Unit]. If the print defect problem is not solved even after replacing the fixing unit, contact your local authorized Canon dealer.
Precautions on Cleaning the Inside of the Printer
IMPORTANT
- When handling a drum cartridge, hold the blue tabs (A) properly as shown in the figure. Do not place it vertically or upside-down.
- When removing or installing the drum cartridges, work from the left side of the printer as shown in the figure.
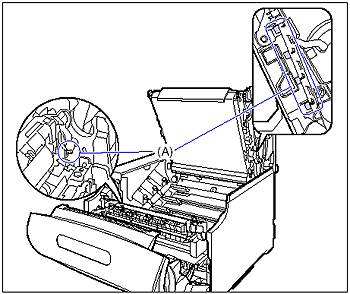
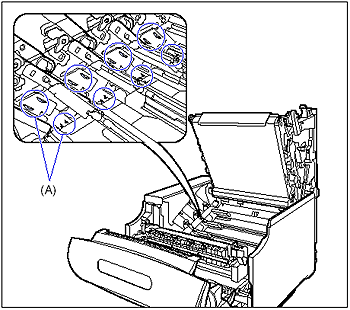
- Be sure not to touch the high-voltage contacts (A) shown in the figure. This may result in damage to the printer.
- Right side of the ITB unit; Inside of the printer
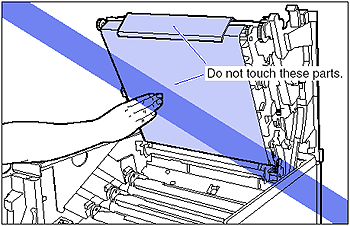
- Do not touch the transfer belt of the ITB unit and the ITB unit cover. If the transfer belt is damaged, this may result in misfeeds or deterioration in print quality. If the print quality deteriorates due to the transfer belt of the ITB unit being touched, see [Cleaning the Transfer Belt of the ITB Unit] and clean the transfer belt of the ITB unit. The transfer belt of the ITB unit is supplied with a function that cleans itself, therefore, you do not need to clean the belt even when toner is on it.
- Close the top cover firmly until it cannot be pressed down any further. If the top cover is not closed firmly, this may result in poor print quality.


 " to release the locks of the drum cartridges.



 " on the label as shown in the figure.
 " to lock the drum cartridge.


 ] and [
  ], then press [OK].

 ] and [
  ], then press [OK].


 ] and [
  ], then press [OK].
