Printing the Nozzle Check Pattern
Solution
Print the nozzle check pattern to determine whether the ink ejects properly from the Print Head nozzles. Use this function when printed results are blurred or the color is incorrect.
NOTE
- Nozzle check pattern cannot be printed from the Front Tray. Always load paper in the Auto Sheet Feeder.
- Ensure that the Inner Cover is closed.
Printing the Nozzle Check Pattern Without a Computer
- Nozzle check pattern printing can be performed also from the printer itself.
1. With the printer on, load a sheet of A4 or Letter-sized plain paper in the Auto Sheet Feeder.
2. Gently press the  mark on the Front Tray to open the Front Tray, then pull out the Front Tray Extension.
mark on the Front Tray to open the Front Tray, then pull out the Front Tray Extension.3. Hold down the RESUME/CANCEL button until the POWER lamp flashes blue twice, and then
release it immediately. The nozzle check pattern is printed. Do not open the Top Cover while printing.

1. With the printer on, load a sheet of A4 or Letter-sized plain paper in the Auto Sheet Feeder.
IMPORTANT
If other than A4 or Letter-sized paper is loaded, you cannot print the nozzle check pattern. Be sure to use A4 or Letter-sized plain paper.
2. Gently press the  mark on the Front Tray to open the Front Tray, then pull out the Front Tray Extension.
mark on the Front Tray to open the Front Tray, then pull out the Front Tray Extension.3. Open the printer properties dialog box.
4. Print the Nozzle Check Pattern.
(1) Click the Maintenance tab.
(2) Click Nozzle Check.
(3) Confirm the displayed message and click Print Check Pattern.
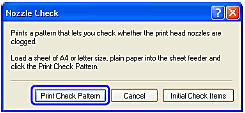
The nozzle check pattern will be printed. Do not open the Top Cover while printing.
NOTE
Clicking Initial Check Items displays the items to be checked before printing the pattern.
5. Examine the pattern and take the appropriate action.
See "Examining the Nozzle Check Pattern".

1. With the printer on, load a sheet of A4 or Letter-sized plain paper in the Auto Sheet Feeder.
IMPORTANT
If other than A4 or Letter-sized paper is loaded, you cannot print the nozzle check pattern. Be sure to use A4 or Letter-sized plain paper.
2 Gently press the  mark on the Front Tray to open the Front Tray, then pull out the Front Tray Extension.
mark on the Front Tray to open the Front Tray, then pull out the Front Tray Extension.3. Open the Canon IJ Printer Utility dialog box.
4. Print the Nozzle Check Pattern.
(1) Select Test Print from the pop-up menu.
(2) Click Nozzle Check.
(3) Confirm the displayed message and click Print Check Pattern.
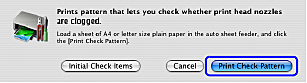
The nozzle check pattern will be printed. Do not open the Top Cover while printing.
NOTE
Clicking Initial Check Items displays the items to be checked before printing the pattern.
5. Examine the pattern and take the appropriate action.
See "Examining the Nozzle Check Pattern".
1 With the printer on, load a sheet of A4 or Letter-sized plain paper in the Auto Sheet Feeder.
IMPORTANT
If other than A4 or Letter-sized paper is loaded, you cannot print the nozzle check pattern. Be sure to use A4 or Letter-sized plain paper.
2. Gently press the  mark on the Front Tray to open the Front Tray, then pull out the Front Tray Extension.
mark on the Front Tray to open the Front Tray, then pull out the Front Tray Extension.3. Open the Canon IJ Printer Utility dialog box.
4. Print the Nozzle Check Pattern.
(1) Select Test Print from the pop-up menu.
(2) Click Nozzle Check.
(3) Confirm the displayed message and click Print Check Pattern.
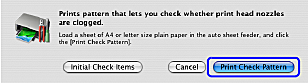
The nozzle check pattern will be printed. Do not open the Top Cover while printing.
NOTE
Clicking Initial Check Items displays the items to be checked before printing the pattern.
5. Examine the pattern and take the appropriate action.
See "Examining the Nozzle Check Pattern".
The nozzle check pattern should appear as follows when ink is discharged properly.
Examine the nozzle check pattern output by the printer, and clean the Print Head when
necessary.
NOTE
The nozzle check pattern will not be printed correctly if there is not enough ink. Replace the ink tank if the remaining amount of ink is insufficient.
See "Replacing an Ink Tank"
1. Confirm the printed nozzle check pattern.
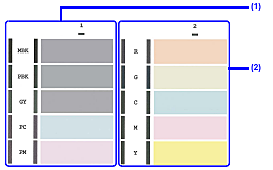
(1) If these patterns have white stripes, the Group1 print head nozzle needs cleaning.
(2) If these patterns have white stripes, the Group2 print head nozzle needs cleaning.
Example: When white stripes appear

2. When cleaning is necessary, click Cleaning on the Pattern Check dialog box.
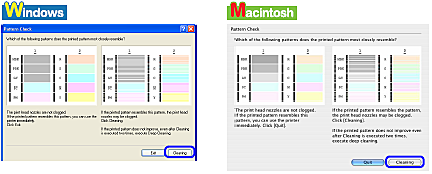
If you want to continue to clean the Print Head from here, go to (3) in step 4 of the Windows or Macintosh Print Head Cleaning procedures as appropriate. See "Print Head Cleaning".
If both of the group (1) and the group (2) patterns have no white stripes, click Exit or Quit. Nozzle check pattern examination finishes.