Solution
- Standard paper: From A5 size (148.0 x 210.0 mm / 5.83 x 8.27 in) to legal size (215.9 x 355.6 mm / 8.5 x 14.0 in)
- Non-standard paper: From 54.0 x 86.0 mm to 215.9 x 584.2 mm (From 2.13 x 3.39 in to 8.5 x 23.0 in)
- Others: Envelopes (European DL and US Com. #10)
64 to 105 gsm (17 to 28 lb)
Do not use paper heavier than this (except for supported Canon-brand media), as it could jam in the paper.
The following types of media can be used.
For more information about the media and the printing methods, refer to the specific sections.
IMPORTANT
Put unused papers back into the package, and store them avoiding high temperature, humid and direct sunlight.
Refer to your setup guide for instructions on how to print with plain papers.
This is a thick paper with a treated surface that enhances gloss and provides superior color reproduction. It is ideal for printing high quality photographs. This media is available in A4/Letter and 4" x 6" / 101.6 x 152.4 mm sizes.
- Loading
- Load the paper with the glossier side facing up.
- A maximum of 1 sheet of A4/Letter paper can be loaded at once. A maximum of 10 sheets of 4" x 6" / 101.6 x 152.4 mm paper can be loaded at once.
- Set the Paper Thickness Lever (gray) to the right.
- If the paper is curled, flatten it before loading.
- Printer Driver Settings
- Media Type: Photo Paper Pro
- Page Size: Ensure that the setting matches the size set in the application.
- Handling of Printed Output
- Do not stack more than 5 sheets in the Paper Output Slot Cover.
- Do not touch the printed surface until the ink is fixed (approx. 30 minutes). Colors in dark images may appear indistinct at first, but become clearer after about 30 minutes.
- When printouts can be arranged without stacking them up, allow them to dry for about 24 hours. When printouts need to be stacked up, allow them to dry for about 24 hours with plain paper (e.g., copying paper) inserted between the adjacent printouts after allowing each printout to dry for about 15 minutes.
- Avoid drying printouts with a hair dryer or by exposing them to direct sunlight.
- Storing Printed Output
- Store printouts in photo albums, plastic folders, and photo frames to protect them from direct exposure to air. Plastic folders protect printouts from color fading. Avoid storing printouts in an adhesive-type album, as you may not be able to remove them.
- When storing printouts in a pocket-type album, insert them in the pockets as far as they will go. The edges of the printouts may turn yellow depending on the type of pocket album.
- Avoid storing printouts in a hot or humid location or in direct sunlight. Store them in a normal operating environment.
- Avoid displaying or exhibiting printouts outdoors or in direct sunlight.
- Printing Area
NOTE
When you use Borderless Printing, create the data by using the same size as the paper size, and paste the data so that it fills the editing screen without leaving any margins. If you are using an application that allows you to set margins, set the left, right, top and bottom margins to 0 mm or 0 inches. For instructions on setting margins, refer to the user's manual for your application.
Photo Paper Plus Glossy PP-101
This is a thick paper with a glossy water-resistant coating and provides superior color reproduction. It is ideal for printing high quality photographs. This media is available in A4/Letter, 4" x 6" / 101.6 x 152.4 mm and 5" x 7" / 127.0 x 177.8 mm sizes.
- Loading
- Load the paper with the glossier side facing up.
- A maximum of 5 sheets of A4/Letter paper can be loaded at once. A maximum of 10 sheets of 4" x 6" / 101.6 x 152.4 mm and 5" x 7" / 127.0 x 177.8 mm paper can be loaded at once.
- To prevent sheets from sticking to each other in the time of using A4/Letter paper, separate them from each other before loading them in the Auto Sheet Feeder. Load the necessary number of paper (a maximum of 5 or 10 sheets) in the Auto Sheet Feeder one at a time.
- Set the Paper Thickness Lever (gray) to the right.
- If the paper is curled, flatten it before loading.
- Printer Driver Settings
- Media Type: Photo Paper Plus Glossy
- Page Size: Ensure that the setting matches the size set in the application.
- Handling of Printed Output
- Do not stack more than 5 sheets in the Paper Output Slot Cover.
- When printouts can be arranged without stacking them up, allow them to dry for about 24 hours. When printouts need to be stacked up, allow them to dry for about 24 hours with plain paper (e.g., copying paper) inserted between the adjacent printouts after allowing each printout to dry for about 15 minutes.
- Avoid drying printouts with a hair dryer or by exposing them to direct sunlight.
- Storing Printed Output
- Store printouts in photo albums, plastic folders, and photo frames to protect them from direct exposure to air. Plastic folders protect printouts from color fading. Avoid storing printouts in an adhesive-type album, as you may not be able to remove them.
- When storing printouts in a pocket-type album, insert them in the pockets as far as they will go. The edges of the printouts may turn yellow depending on the type of pocket album.
- Avoid storing printouts in a hot or humid location or in direct sunlight. Store them in a normal operating environment.
- Avoid displaying or exhibiting printouts outdoors or in direct sunlight.
- Printing Area
NOTE
When you use Borderless Printing, create the data by using the same size as the paper size, and paste the data so that it fills the editing screen without leaving any margins. If you are using an application that allows you to set margins, set the left, right, top and bottom margins to 0 mm or 0 inches. For instructions on setting margins, refer to the user's manual for your application.
Photo Paper Plus Semi-Gloss SG-101
This is a matte water-resistant paper and provides superior color reproduction. It is ideal for printing high quality photographs. This media is available in A4/Letter and 4" x 6"/101.6 x 152.4 mm sizes.
- Loading
- Load the paper with the side that does not have logos facing up.
- A maximum of 1 sheet of A4/Letter paper can be loaded at once. A maximum of 10 sheets of 4" x 6" / 101.6 x 152.4 mm paper can be loaded at once.
- To prevent sheets of paper from sticking to each other in the time of using A4/Letter paper, separate them from each other before loading them in the Auto Sheet Feeder. Load the necessary number of paper (a maximum of 5 or 10 sheets) in the Auto Sheet Feeder one at a time.
- Set the Paper Thickness Lever (gray) to the right.
- If the paper is curled, flatten it before loading.
- Printer Driver Settings
- Media Type: Photo Paper Plus Glossy
- Page Size: Ensure that the setting matches the size set in the application.
- Handling of Printed Output
- Do not stack more than 5 sheets in the Paper Output Slot Cover.
- When printouts can be arranged without stacking them up, allow them to dry for about 24 hours. When printouts need to be stacked up, allow them to dry for about 24 hours with plain paper (e.g., copying paper) inserted between the adjacent printouts after allowing each printout to dry for about 15 minutes.
- Avoid drying printouts with a hair dryer or by exposing them to direct sunlight.
- Storing Printed Output
- Store printouts in photo albums, plastic folders, and photo frames to protect them from direct exposure to air. Plastic folders protect printouts from color fading. Avoid storing printouts in an adhesive-type album, as you may not be able to remove them.
- When storing printouts in a pocket-type album, insert them in the pockets as far as they will go. The edges of the printouts may turn yellow depending on the type of pocket album.
- Avoid storing printouts in a hot or humid location or in direct sunlight. Store them in a normal operating environment.
- Avoid displaying or exhibiting printouts outdoors or in direct sunlight.
- Printing Area
NOTE
When you use Borderless Printing, create the data by using the same size as the paper size, and paste the data so that it fills the editing screen without leaving any margins. If you are using an application that allows you to set margins, set the left, right, top and bottom margins to 0 mm or 0 inches. For instructions on setting margins, refer to the user's manual for your application.
This is a thick matte water-resistant paper and provides superior color reproduction. It is suitable for a variety of printing purposes such as paper crafts, calendars and photos with matte finish.
This media is available in A4/Letter sizes.
- Loading
- Load the paper with the whiter side facing up.
- A maximum of 10 sheets of A4/Letter paper can be loaded at once.
- Set the Paper Thickness Lever (gray) to the right.
- Printer Driver Settings
- Media Type: Matte Photo Paper
- Page Size: Ensure that the setting matches the size set in the application.
- Handling of Printed Output
- Do not stack more than 5 sheets in the Paper Output Slot Cover.
- Colors may slightly change if papers are stacked up before the ink is completely dry. It is recommended that you allow the ink to dry for 24 hours.
- Do not attempt to dry the ink with a hair dryer or by exposing printed sheets to direct sunlight.
- Storing Printed Output
- Do not store or display printouts in hot, damp or humid conditions. Never expose them to heat or direct sunlight.
- Store printouts in photo albums, photo frames or presentation binders to protect them from direct exposure to air or sunlight.
- Do not mount printouts in an adhesive-type album, as you may not be able to remove them.
- Be aware that some types of plastic folders and albums may cause the edges of the paper to turn yellow.
- Printing Area
NOTE
When you use Borderless Printing, create the data by using the same size as the paper size, and paste the data so that it fills the editing screen without leaving any margins. If you are using an application that allows you to set margins, set the left, right, top and bottom margins to 0 mm or 0 inches. For instructions on setting margins, refer to the user's manual for your application.
Glossy Photo Paper GP- 401
This paper is thicker than High Resolution Paper and has a glossy printing surface to produce printouts close to photograph quality. This media is available in A4/Letter, 4" x 6" / 101.6 x 152.4 mm and Credit Card sizes.
- Loading
- Load the paper with the whiter side facing up.
- A maximum of 10 sheets can be loaded at once.
- Be sure to set the paper to portrait regardless of the direction to print.
- To prevent sheets from sticking to each other in the time of using A4/Letter paper, separate them from each other before loading them in the Auto Sheet Feeder. Load the necessary number of paper (a maximum of 10 sheets) in the Auto Sheet Feeder one at a time.
- Set the Paper Thickness Lever (gray) to the right.
- Printer Driver Settings
- Media Type: Glossy Photo Paper
- Page Size: Ensure that the setting matches the size set in the application.
- Handling of Printed Output
- Remove each sheet as soon as it is printed.
- Do not touch the printed surface nor stack the printed sheets until the ink is fixed (approx. two minutes).
- Printing Area
NOTE
When you use Borderless Printing, create the data by using the same size as the paper size, and paste the data so that it fills the editing screen without leaving any margins. If you are using an application that allows you to set margins, set the left, right, top and bottom margins to 0 mm or 0 inches. For instructions on setting margins, refer to the user's manual for your application.
This type of paper provides better color reproduction than plain paper. It is suitable for printing business documents that feature graphics, and printing photographs. This media is available in A4 / Letter size.
- Loading
- Load the paper with the whiter side facing up.
- Do not load paper higher than the limit mark. A maximum of 10 sheets can be loaded.
- Set the Paper Thickness Lever (gray) to the right.
- Printer Driver Settings
- Media Type: High Resolution Paper
- Page Size: Ensure that the setting matches the size set in the application.
- Handling of Printed Output
Do not stack more than 10 sheets in the Paper Output Slot Cover. If the output paper is curled, it may prevent the next sheet being ejected. In this case, or if the ink takes a long time to dry, remove each sheet as soon as it is printed.
Photo Paper Plus Double Sided PP-101D
This paper is provided with glossy coating on both sides, ensuring superior color reproduction.
This paper is suitable for borderless printing.
IMPORTANT
When using Photo Paper Plus Double Sided paper, be sure to clean the inside of the printer before printing.
If the inside of the printer is dirty, printed paper may be smudged.
This media is available in A4 / Letter and 5" x 7" / 127.0 x 177.8 mm sizes.
- Loading
- Load only one sheet at a time.
- Set the Paper Thickness Lever (gray) to the right.
- If paper is curled, uncurl it before loading in the Auto Sheet Feeder.
- Clean the space by the side of Paper Output Slot Cover, so that neither garbage nor dirt adheres to paper.
NOTE
To Print with Duplex Printing (In Windows)
After printing one side, load the paper in the Auto Sheet Feeder to print on the other side, according to the message shown on the screen.
- Printer Driver Settings
- Media Type: Photo Paper Plus Double Sided
- Page Size: Ensure that the setting matches the size set in the application.
- Handling of Printed Output
- Remove each sheet as soon as it is printed.
- After printing, dry the printouts for more than 30 minutes. When printouts need to be stacked up, allow them to dry for about 48 hours with a plain paper in the package of the media inserted between the adjacent printouts after allowing each printout to dry for about 30 minutes.
- Avoid drying printouts with a hair dryer or by exposing them to direct sunlight.
- Do not touch the surfaces of printouts or stack them up before ink dries up.
- Storing Printed Output
- Store printouts in album or plastic files to protect them from direct exposure to air.
* Album or plastic files protect printouts from color fading.
- Avoid storing printouts in a hot or humid location or in direct sunlight. Store them in a normal operating environment.
- Avoid displaying or exhibiting printouts outdoors or in direct sunlight.
- Printing Area
NOTE
When creating a photograph or illustration data subject to borderless printing, select the same size as that of the paper you use and paste it in the editing window without providing any margin.
If your application software can set margins, set the left, right, top, and bottom margins to "0 mm". For how to set margins, refer to the instruction manual for your application software.
This paper is used to create iron-on transfers. The image is printed backwards when Media Type is set to T-Shirt Transfers in the printer driver.
NOTE
For the customers in the United States, use the T-Shirt Transfers TR-101.
- Loading
- Load the paper with the side that does not have green lines facing up.
- Load only one sheet at a time.
- Set the Paper Thickness Lever (gray) to the right.
- If the T-Shirt Transfer is curled, flatten it by curling it in the opposite direction.
- Printer Driver Settings
- Media Type: T-Shirt Transfers
- Page Size: Ensure that the setting matches the size set in the application.
- Handling of Printed Output
- Remove each sheet as soon as it is printed.
- The T-Shirt Transfer should be used as soon as possible. Refer to the supplied instructions for details on how to use the paper.
This film is ideal for printing presentation material for use with overhead projectors.
- Loading
- Place one sheet of plain A4/Letter paper under the transparencies in the Auto Sheet Feeder.
- A maximum of 10 sheets can be loaded at once.
- Set the Paper Thickness Lever (gray) to the right.
- To prevent sheets from sticking to each other, separate them from each other before loading them in the Auto Sheet Feeder. Load the necessary number of paper (a maximum of 10 sheets) in the Auto Sheet Feeder one at a time.
- Printer Driver Settings
- Media Type: Transparencies
- Page Size: Ensure that the setting matches the size set in the application.
- Handling of Printed Output
- Remove each sheet as soon as it is printed.
- Do not touch the printed surface until the ink is fixed (approx. 15 minutes).
Photo Stickers PS-101 is a peel-and-stick sheet that allows you to make your original stickers using your favorite photo. It is a glossy sheet and is highly resistant to water. On each sheet, you can print 16 photo stickers with excellent printing quality. This media is available in the size of 4" x 6" / 101.6 x 152.4 mm.
- Loading
- Load each sheet with the glossy side up. Printing on the back side can stain the inside of the printer or your clothes.
- Place the sheet in portrait in such a manner that the top margin is larger than the bottom margin. For more information, refer to the instructions on the back of the sheet package.
- Load one sheet at a time.
- If a sheet is curled, uncurl it before loading.
- Do not use a sheet from which stickers are going to come off or you have peeled off stickers.
- Set the Paper Thickness Lever (gray) to the right.
- Printer Driver Settings
- Media Type: Photo Paper Plus Glossy
- Page Size: 4" x 6" / 101.6 x 152.4 mm
- Handling of Printed Output
- Remove each sheet as soon as it is printed.
NOTE
When printing a Photo Stickers (PS101) sheet, it is recommended using the PhotoRecord (v2.2 or later) provided with the printer. It is easily printed by selecting "16-Sticker Label" from "Perforated Paper" menu in the "Select Printer & Album Type" of the PhotoRecord (Windows only).
Use either European DL or US Com. #10 size envelopes.
- Preparation for Printing
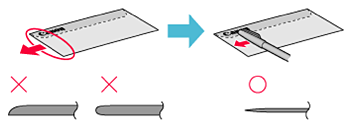
1. Press down on all four corners and edges of the envelopes to flatten them as shown in 2 below.
2. If the envelopes are curled, hold the opposite corners and gently bend them in the opposite direction.
Ensure that the flap of the envelope is perfectly straight.
3. If the leading edge of an envelope is puffed up or curled, use a pen to press the envelope flat and sharpen the crease.
Press the envelope completely flat, working from the middle to the edge.
* The above illustrations show a side view of the leading edge of the envelope.
Envelopes may jam in the printer if they are not completely flat and the edges are not aligned.
Ensure that no curl or puff exceeds 3 mm (0.1 in).
- Unsuitable Envelopes
- Envelopes with an embossed or treated surface
- Envelopes with a double flap or pressure seals
- Envelopes with sticker flaps
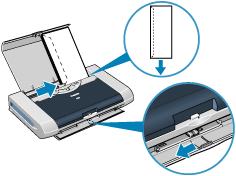
- Loading
- Place envelopes lengthwise with the flap to the left and the address side facing upwards.
- A maximum of 5 envelopes can be loaded at once.
- Set the Paper Thickness Lever (gray) to the left.
NOTE
If the envelopes do not feed properly, even after removing curl, clean the Paper Feed Roller.
Also, if you decrease the number of paper loaded, it may be fed successfully.
- Printer Driver Settings
- Media Type: Envelope
- Page Size: Select either DL Env. or #10 Env. according to the envelope size you are using.
- Orientation: Landscape
- Handling of Printed Output
Do not stack more than 5 sheets in the Paper Output Slot Cover.