Solution
When you have installed the printer driver via a network and specified a temporary port (not the port you are going to use), specify the port settings by following the procedure below.
Check these settings also when data cannot be transmitted via the network.
The port settings require the machine's IP address. Check the machine's IP address on the control panel display or by printing the USER'S DATA LIST.
For instructions on how to check the machine's IP address on the control panel, see "Setting the IP Address (MF4370dn/D480 Only) (Related information)." For printing the USER'S DATA LIST, see "Printing Reports and Lists Manually (Related information)."
NOTE
- The following procedures are explained using sample screens from Windows XP Professional.
- The screen may differ according to the operating system.
1. Open the printer properties dialog box.
For Windows XP Professional/Server 2003, click [start] on the Windows task bar -> [Printers and Faxes].
For Windows XP Home Edition, click [start] on the Windows task bar -> [Control Panel] -> [Printers and Other Hardware] -> [Printers and Faxes].
For Windows Vista/Server 2008, click

[Start] on the Windows task bar -> [Control Panel] -> [Printer] under [Hardware and Sound].
For Windows 2000, click [Start] on the Windows task bar -> [Settings] -> [Printers].
2. Right-click the icon of the printer you installed -> select [Properties] from the pull-down list.
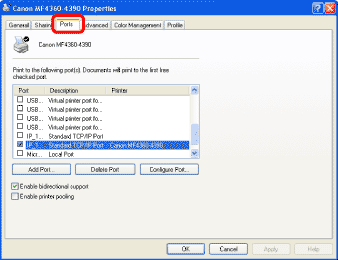
3. Display the [Ports] sheet by clicking the [Ports] tab.
4. Open the [Printer Ports] dialog box by clicking [Add Port].
5. From [Available ports types], select [Standard TCP/IP Port] -> click [New Port].
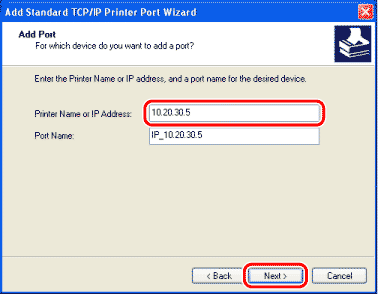
The Add Standard TCP/IP Printer Port Wizard starts.
7. In [Printer Name or IP Address], enter the machine IP address or machine host name -> click [Next].
After the computer confirms that there is a machine in which the entered IP address is assigned, the [Completing the Add Standard TCP/IP Printer Port Wizard] window appears.
 [Start] on the Windows task bar -> [Control Panel] -> [Printer] under [Hardware and Sound].
