Solution
You can save scanned data on the USB flash drive or memory card using the Operation Panel.
IMPORTANT
Do not remove the USB flash drive or memory card from the machine under the following conditions:
- while scanning is in progress
- before saving the scanned data
- You cannot use the USB flash drive and memory card at the same time. Be sure to use either of them as a media for saving scanned data.
- Scanned data saved on the memory card cannot be printed with the card direct printing.
- For safety reasons, we recommend storing the scanned data saved on a memory card or a USB flash drive to another media periodically to avoid unexpected accidents.
- We assume no responsibility for damage or loss of data for whatever reasons even within the warranty period.
1. Make sure that the machine is turned on.
2. Press the SCAN button.
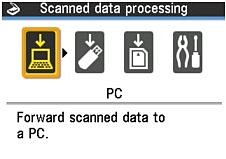
The screen for selecting to which you save the data is displayed.
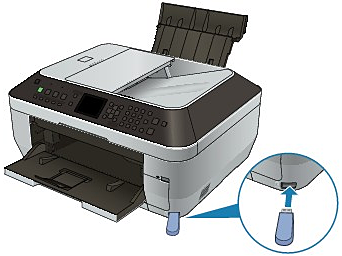
3. Insert the USB flash drive in the Direct Print Port or the memory card in the Card Slot.
4. Use the

button to select

USB flash drive or

Memory card, then press the OK button.
5. Load the original document on the Platen Glass or in the ADF.
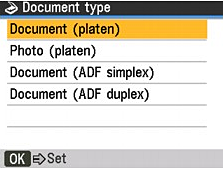
6. Use the

button to select the document type, then press the OK button.
Document (platen)
Scan documents on the Platen Glass.
Photo (platen)
Scan photos on the Platen Glass.
Document (ADF simplex)
Scan single-sided documents in the ADF.
Document (ADF duplex)
Scan double-sided documents in the ADF.
IMPORTANT
Make sure that the document has been loaded correctly according to the document type that you have selected.
NOTE
When double-sided documents are loaded in the ADF, the document pages are not ejected in the original order by default. If you want the document pages to eject in the original order, set Two-sided output setting to Output by page.
7. Confirm the settings, then press the OK button.
Press the Settings button to adjust the settings as necessary.
8. Confirm the message, then press the OK button.
9. Press the Color button for color scanning, or the Black button for black & white scanning.
The machine starts scanning and scanned data is saved either on the USB flash drive or the memory card, which you select as the media for saving scanned data.
Remove the original on the Platen Glass or the Document Output Slot after scanning is complete.
NOTE
- When you select PDF as the data format, you can scan documents from the Platen Glass continuously. After scanning is complete, select Continue on the confirmation screen. Load the next document on the Platen Glass, then press the Color button for color scanning, or the Black button for black & white scanning. You can save up to 100 pages of images in one PDF file.
- If the USB flash drive or the memory card becomes full while scanning images is in progress, only the images already scanned can be saved.
- You can save up to 2000 files of scanned data in both JPEG and PDF data format.
- The folder and file name of scanned data saved on the USB flash drive or the memory card is as follows:
Folder name: (file extension: PDF): CANON_SC\DOCUMENT\0001
Folder name: (file extension: JPG): CANON_SC\IMAGE\0001
File name: Running numbers, starting from SCN_0001
File date: Saving on the date and time registered in the machine.
- Importing the Scanned Data Saved on the Memory Card to the Computer When you import the scanned data saved on the memory card to the computer, import the data after performing either of the operations below:
-Turning the machine off, then turn it back on.
-Removing the memory card, then reinsert it into the Card Slot.
You can optimize or print the scanned data saved on the memory card using MP Navigator EX.
- Importing the Scanned Data Saved on the USB Flash Drive to the Computer
You can import the scanned data saved on the USB flash drive to the computer.
After scanning the data, connect the USB flash drive to the computer, then import the data using Windows Explorer.
You can import the scanned data saved on the USB flash drive to the computer.
After scanning the data, connect the USB flash drive to the computer, then import the data.
Inserting the USB Flash Drive
IMPORTANT
Before inserting the USB flash drive:
- You may need an extension cable if the USB flash drive cannot be inserted into the Direct Print Port of the machine. For details, ask an electronics store.
- Depending on the type of USB flash drive, the operation may not be guaranteed.
- Some USB flash drives with security settings may not be used.
1. Insert the USB flash drive in the Direct Print Port.
Make sure that the USB flash drive is correctly oriented before inserting it straightforward into the Direct Print Port.
Removing the USB Flash Drive
1. Make sure that the machine is not writing data to the USB flash drive.
Check if the writing operation is completed on the LCD.
IMPORTANT
Do not remove the USB flash drive or turn off the power while the machine is operating.
NOTE
If you use the USB flash drive with the access lamp, refer to the instruction manual supplied with the USB flash drive to check if the writing operation is completed on the USB flash drive.
2. Remove the USB flash drive.
Hold the USB flash drive and remove it from the machine straightforward.

 button to select
  USB flash drive or
  Memory card, then press the OK button.
 button to select the document type, then press the OK button.


