Using an external microphone
16-Feb-2011
8200764500
Solution
Using the mini advanced shoe, you can attach to the camcorder a range of optional accessories to expand its functionality. For details about how to attach and use the accessories, refer to the instruction manual of the accessory used.
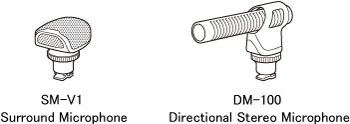
Using the SM-V1 you can add a sense of depth and presence to your recordings with 5.1ch surround sound. Using the DM-100 you can accurately record audio coming directly from the direction you are recording.

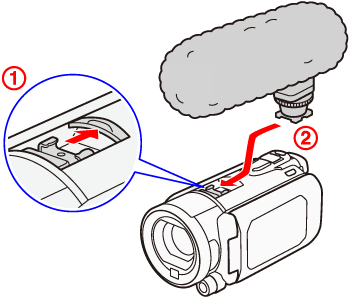
- Attaching an external microphone (The optional DM-100 directional stereo microphone is used as an example.)

 Retract the mini advanced shoe cover in the direction of the arrow.
 Attach the optional accessory to the mini advanced shoe.
When a compatible accessory is attached to the mini advanced shoe,[  ] will appear on the screen.
 ] will appear on the screen.
CAUTION
- Accessories designed for the Advanced Accessory Shoe cannot be used with this camcorder. Look for video accessories bearing this logo to ensure compatibility with the mini advanced shoe.

- Playing back recordings made with the optional SM-V1 Surround Microphone:
You can enjoy 5.1ch surround sound playback on HDTVs compatible with 5.1ch surround sound connected to the camcorder using an HDMI cable. Audio output from the AV OUT/  terminal (including headphone output) will be converted to 2ch stereo. The camcorder's built-in speaker is monaural.
 terminal (including headphone output) will be converted to 2ch stereo. The camcorder's built-in speaker is monaural.
- When an external microphone is connected to the camcorder, [Wind Screen] will automatically be set to [Off
 ].
]. - When using the optional SM-V1 Surround Microphone, change the microphone's directionality mode with the [Surround Mic Directionality] setting.
- If the audio level is too high and the sound gets distorted, adjust the audio recording level manually or activate the microphone attenuator with the [Microphone Attenuator] setting (or [Surround Mic Attenuator] when the optional SM-V1 Surround Microphone is attached to the camcorder).
REFERENCE
- While wireless transfer is in progress, if you record a movie using an external microphone, the audio may contain noise. When recording movies, make sure to set [ Eye-Fi Communication ]* to [ Off. ].
* This menu option will appear only when using an Eye-Fi card.
- This product is not guaranteed to support Eye-Fi card functions (including wireless transfer). In case of an issue with an Eye-Fi card, please check with the card manufacturer. Also note that an approval is required to use Eye-Fi cards in many countries or regions. Without approval, use of the card is not permitted. If it is unclear whether the card has been approved for use in the area, please check with the card manufacturer.
You can also use commercially available microphones. Connect the external microphone to the MIC terminal. Use commercially available condenser microphones with their own power supply. You can connect almost any stereo microphone with a φ 3.5 mm plug but audio recording levels may vary.

CAUTION
- When an external microphone is connected to the camcorder, [Wind Screen] will automatically be set to [Off
 ].
]. - If the audio level is too high and the sound gets distorted, turn on the microphone attenuator or adjust the audio recording level manually.
REFERENCE
- While wireless transfer is in progress, if you record a movie using an external microphone, the audio may contain noise. When recording movies, make sure to set [ Eye-Fi Communication ]* to [ Off. ].
* This menu option will appear only when using an Eye-Fi card.
- This product is not guaranteed to support Eye-Fi card functions (including wireless transfer). In case of an issue with an Eye-Fi card, please check with the card manufacturer. Also note that an approval is required to use Eye-Fi cards in many countries or regions. Without approval, use of the card is not permitted. If it is unclear whether the card has been approved for use in the area, please check with the card manufacturer.