
How to register a custom paper size (non-standard paper)
Solution
When printing custom size paper, you need to register the custom paper size in the printer driver previously using the following procedure.
NOTE
Clarifications of the operation and additional explanations for the procedure are indicated at the end of this page. Reading these notes is highly recommended.
1. Display the [Page Setup] sheet, then click [Custom Paper Size].

2. Specify the following options as needed.
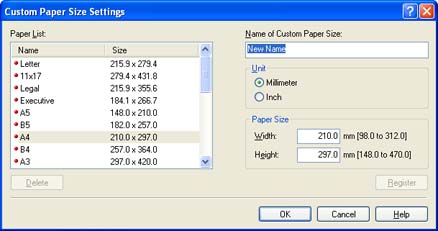
| Setting | Contents |
| [Paper List] | Displays [Name] and [Size] of standard paper sizes and added custom paper sizes. |
| [Name of Custom Paper Size] | You can enter the name of the custom paper size to be added. Up to 31 characters can be entered. |
| [Unit] | Specify the unit ([Millimeter] or [Inch]) to be used when setting the custom paper size. |
| [Paper Size] |
Specify the height and width of the custom paper size ([Height] [Width]). Specify the custom paper size in portrait orientation ([Height][Width]) within user-definable sizes. [Width]). Specify the custom paper size in portrait orientation ([Height][Width]) within user-definable sizes.
|
3. Click [Register].
4. Confirm the settings, then click [OK].
NOTE
a. To specify a custom paper size, display the following dialog box.
- For Windows 2000/XP/Server 2003
Display the [Document Properties] dialog box from the [Printers] folder (the [Printers and Faxes] folder for Windows XP/Server 2003).
- For Windows 98/Me
Display the [Printer Properties] dialog box from the [Printers] folder.
b. On Windows 98/Me, up to 30 custom paper sizes can be added. On Windows 2000/XP/Server 2003, the number depends on the system environment.