Issue
You can set the IP address from the Printer Status Window if the printer driver has already been installed by the USB connection.
NOTE
The screen shots used in this section are from Windows XP Professional with which LBP5000 is being used.
Cause and Solution
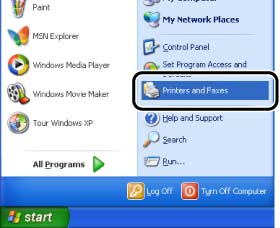
1. Display the [Printers and Faxes] folder or the [Printers] folder.
For Windows 98/Me/2000: From the [Start] menu, select [Settings] -> [Printers].
For Windows XP Professional/Server 2003: From the [Start] menu, select [Printers and Faxes].
For Windows XP Home Edition: From the [Start] menu, select [Control Panel], and then click [Printers and Other Hardware] -> [Printers and Faxes].
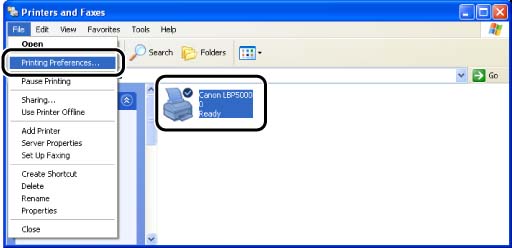
2. Select the icon for your printer, then select [Printing Preferences] from the [File] menu.
For Windows 98/Me: Select the icon for your printer, then select [Properties] from the [File] menu.
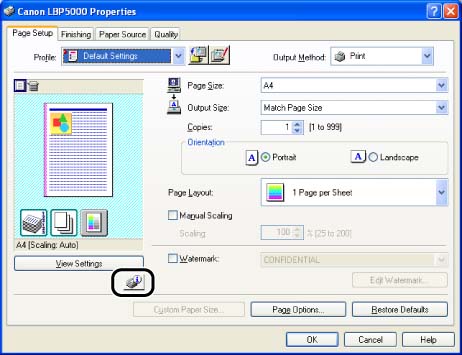
3. Display the [Page Setup] sheet, then click the [Display Printer Status Window] button to run the Printer Status Window.
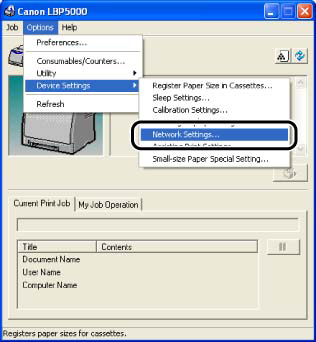
4. From the [Options] menu, select [Device Settings] -> [Network Settings].
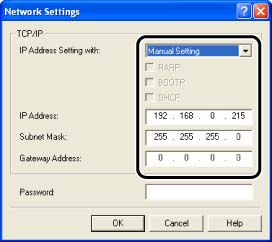
5. Specify the IP address.
Options to be specified
[IP Address Setting with]: Select the method for setting the IP address.
[Manual Setting]:
Allows you to specify the IP address directly. The IP address entered for [IP Address] is specified for the network board.
[Auto Detect]:
Obtains an IP address using RARP, BOOTP, or DHCP.
[RARP]:
Obtains an IP address using RARP. (The RARP daemon needs to be started up.)
[BOOTP]:
Obtains an IP address using BOOTP. (The BOOTP daemon needs to be started up.)
[DHCP]:
Obtains an IP address using DHCP. (The DHCP server needs to be started up.)
[IP Address]: Enter the IP address of the network board.
Options to be specified as needed
[Subnet Mask]: Enter the subnet mask that is being used on the TCP/IP network.
[Gateway Address]: Enter the gateway address that is being used on the TCP/IP network.
[Password]: Enter the administrator password for the network board. If the password has not been specified yet, it is not required to enter the password.
NOTE
a. If [RARP] is selected, you cannot enter any value in [IP Address].
b. If [BOOTP] or [DHCP] is selected, you cannot enter any value in [IP Address], [Subnet Mask], and [Gateway Address].
c. If you cannot use RARP, BOOTP, and DHCP, specify [Manual Setting].
6. After completing the settings, click [OK].
