Solution
Remote Switch and Remote Controller
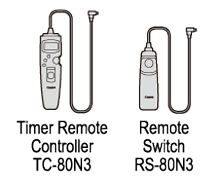
You can connect the Remote Switch RS-80N3, Timer Remote Controller TC-80N3 (both sold separately), or any EOS accessory equipped with an N3-type terminal to the camera for shooting.
NOTE
- To operate the accessory, refer to its instruction manual.
- Remote control shooting is also possible with devices such as an EX-series Speedlite equipped with a remote-release function.
Connecting the Remote Switch
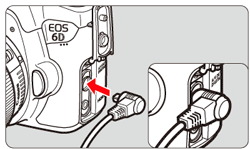
1. Open the terminal cover.
2. Connect the plug as shown in the illustration.
REFERENCE
To disconnect the plug, grasp the silver part and pull.
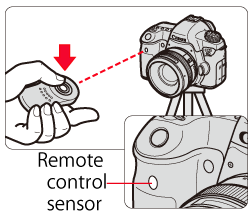
With Remote Controller RC-6 (sold separately), you can shoot remotely up to approx. 5 meters/16.4 feet from the camera. You can either shoot immediately or use a 2-sec. delay. You can also use Remote Controller RC-1 and RC-5.
1. Set the power switch to <ON>.
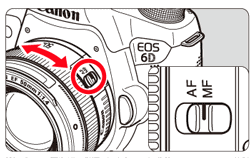
3. Set the lens focus mode switch to<MF>. You can also shoot with <AF>.
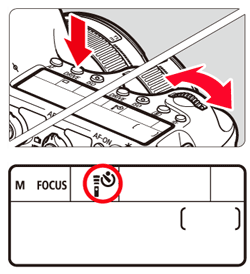
4. Press the <DRIVE> button. Select the self-timer. Look at the LCD panel and turn the <Main Dial> to select <

>(10-sec. delay) or <

>(2-sec. delay).
5. Point the remote controller toward the camera’s remote control sensor and press the transmit button.
The self-timer lamp lights up and the picture is taken.
CAUTION
Fluorescent or LED lighting may cause camera misoperation by triggering the shutter inadvertently. Try to keep the camera away from such light sources.
NOTE
When shooting movies using a remote controller, follow the above Steps 1 to 4, set the shooting timing switch of the Remote Controller RC-6 (sold separately) to <2>(2-sec. delay), and then press the transmit button.If the switch is set to <

> (immediate shooting), still photo shooting will take effect.

 >(10-sec. delay) or <
  >(2-sec. delay).
 > (immediate shooting), still photo shooting will take effect.