Printing from a Computer (USB cable) (SELPHY CP1200)
Solution
IMPORTANT
- When installing or uninstalling, log in with administrator permissions.
- In the text, there are images that include the model names or the software names. The way the names are displayed depends on your SELPHY model.
- You may not be able to carry out the installation if you are using security software.
SELPHY can connect to computers running the following operating systems.
| Windows | Mac OS | |
| OS | Windows 8.1 Windows 8 Windows 7 SP1 | Mac OS X 10.8 or later |
1. Install the printer driver.
- Insert the included CD-ROM (SELPHY CP1200 Solution) into the computer, and double-click the CD-ROM icon displayed in [(My) Computer].
- Double-click the [Driver] folder, and then double-click [Setup.exe].
- Follow the instructions displayed to complete installation.
- If the [User Account Control] window is displayed, follow the on-screen instructions.
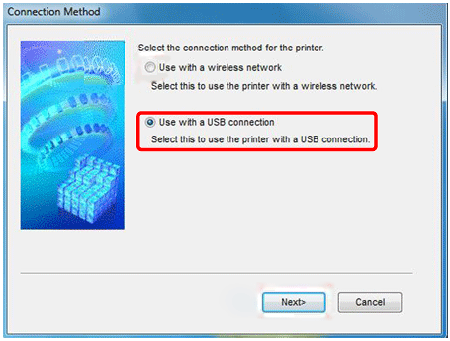
2. Choose the connection method.
When the screen below is displayed, select [Use via USB Connection] and click [Next].
3. When the screen below is displayed, prepare the printer and connect it to the computer.
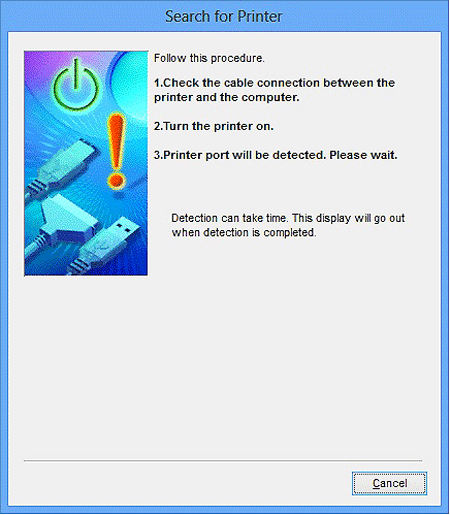
- Turn off SELPHY and remove any inserted memory cards or USB flash drives.
- Insert a loaded paper cassette and an ink cassette in SELPHY.
REFERENCE
For details, refer to Printing images with your new SELPHY CP1200 photo printer.
- Use the USB cable to connect SELPHY to the computer. For instructions, refer to the computer or cable user manual.
 USB cable, sold separately
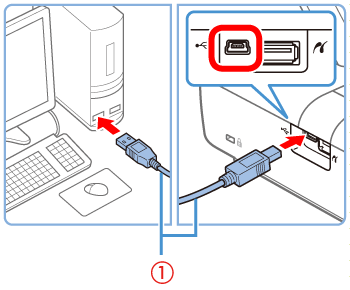
4. Turn on the printer to complete the installation process.
- Press the [
 ] button to turn on SELPHY.
 - The printer driver is installed.
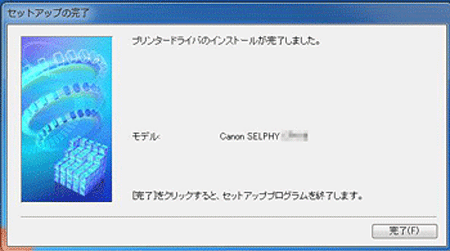
The computer is now prepared.
1. Prepare SELPHY.
- Remove any inserted memory cards or USB flash drives.
- Insert a loaded paper cassette and an ink cassette in SELPHY.
- If the printer and computer are not connected yet, turn off the printer momentarily, connect it to the computer via USB, and then turn on the printer again.
Carry out the procedure from step 2 on the computer.
2. Access the printing dialog box.
- Start the photo software, select images to print, and access the printing dialog box.
- As the destination printer, select [Canon SELPHY CP1200].
3. Choose printing options.
- Choose a paper size corresponding to the size of paper and ink cassettes in SELPHY. Also, choose bordered or borderless printing as an option with the listed paper sizes.
- Choose the printing orientation and number of copies, as desired.
4. Print.
IMPORTANT
- Printing in progress cannot be canceled from SELPHY by using the [
 ] button. To cancel printing, use the computer to delete the print job.
 - The printer may not work correctly if it is connected to the computer via a USB hub.
- Avoid allowing your computer to enter sleep or standby mode while SELPHY is connected via USB. If the computer enters standby mode with SELPHY connected via USB, wake the computer without disconnecting the USB cable. If recovery fails, restart the computer.
- For computer or photo software instructions, refer to the relevant user manual.
NOTE
- If an error message is displayed on SELPHY, also check for any error messages displayed on the computer (in desktop mode). Messages will be automatically dismissed once you resolve the issue indicated.
- If a message is displayed on the computer, you can also click [Cancel] to cancel printing.