Solution
As you check the shooting screen on your smartphone, you can use it to shoot remotely.
With an Android™ smartphone (OS version 4.0 or higher) that supports NFC, you can also shoot using the NFC function.
IMPORTANT
- In the text, the operation instructions that begin with this illustration
 are for smartphones. The operation instructions that begin with this illustration
  are for cameras.
- In any mode other than [
 ], [
], [  ],
],  ], and [
  ], the camera works in [
  ] mode. However, some [FUNC.] and [MENU] settings you have configured in advance may be changed automatically.
- Movie shooting is not available.
- For convenience in this article, Android™ smartphones, tablets, and other compatible devices are collectively referred to as "smartphones".
- Privacy settings must be configured in advance to allow image viewing on the smartphone.
- In order to use a smartphone for controlling the camera and remote shooting, you need to install Camera Connect on your smartphone first.
NOTE
- Do not cover the Wi-Fi antenna area with your hands or other objects. Covering the antenna may decrease the speed of image transfers.
- Connections require that a memory card be in the camera.
- On the camera screen, wireless signal strength is indicated by the following icons.
- [

] : high, [

] : medium, [

] : low, [

] : weak
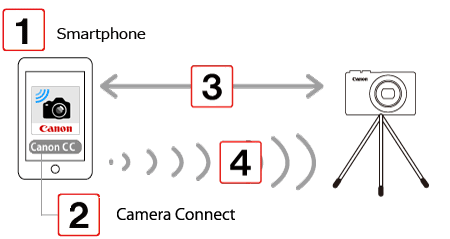
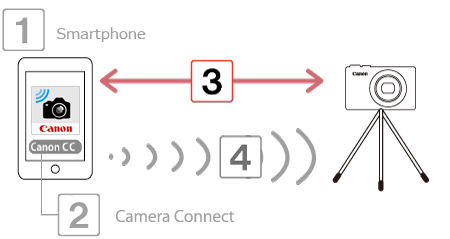
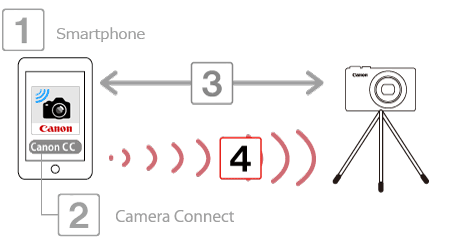
The following 4 steps explain how to use a smartphone to control the camera and shoot remotely via the Wi-Fi function. Start the operation from step 1.

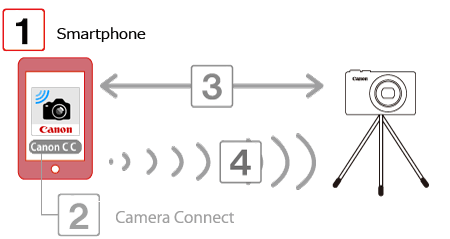
: Check the OS version on your smartphone.

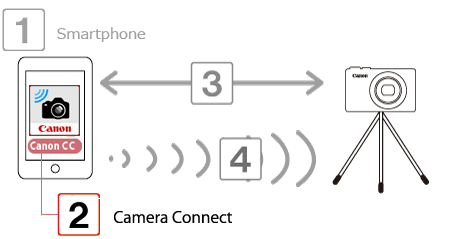
: Install Camera Connect on your smartphone and turn Wi-Fi on.

: Connect the camera and smartphone.

: Use the smartphone to shoot.
Step 1: Confirming the OS version

1. Check the smartphone’s specifications.
- To confirm the Android™ OS version information, check the [Settings] menu (
 )
)  [About device]
  [Android version].
IMPORTANT
Please refer to the related information for details on the smartphones which can be connected with a camera wirelessly.
NOTE
- Turning off the sleep function of the smartphone is recommended.
- The setting procedures and items may differ depending on the Android™ OS version installed on your smartphone.
Step 2: Install Camera Connect on your smartphone and turn Wi-Fi on
NOTE
- Here, instructions are given using Android™ OS 4.0 as an example.
- The text includes an example of a smartphone screen. The items displayed on the screen may differ depending on the model of your smartphone. For details, refer to the user manual for your smartphone.
- Interface or functions of Camera Connect are subject to change, for application improvement or update. In such a case, features of Camera Connect may differ from sample screens or operation instructions in this explanation.
REFERENCE
- If Camera Connect is not yet installed on your Android™ smartphone (OS version 4.0 or higher) that supports NFC, touch the N-Mark [
 ] on the smartphone against the camera's N-Mark to make Google Play™ start automatically on the smartphone and to open the Camera Connect download screen.
- Using an NFC-compatible Android™ smartphone (OS version 4.0 or later) simplifies the process of connecting to the camera via NFC. When using Camera Connect to shoot remotely, make sure that the camera is in [Shooting Mode] or in [Power OFF] mode before establishing the connection.

1. Touch the [Play Store] icon on your smartphone to start Google Play™.
IMPORTANT
- You can download Camera Connect for free. However, you will be charged communication fees when connecting to Google Play™.
- You need a Google account to download Camera Connect.
- You cannot download Camera Connect without Google Play™ installed on your smartphone.
- When you use a cell phone line, downloading may take longer than when you use a Wi-Fi connection.

2. Touch the search icon.

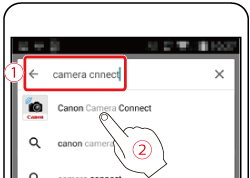
3. Enter "Camera Connect" as the keyword in the search field

and then tap the search icon

.

4. Select [Camera Connect] in the search results and install it.
The home screen will reappear when the installation of Camera Connect is complete.

5. Touch the menu key on your smartphone and then touch [Settings] (

).

6. Make sure your smartphone is not in airplane mode.

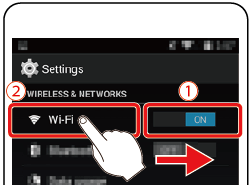
7. Turn the [Wi-Fi] switch ON (

) and then tap [Wi-Fi] (

).

8. Choose a shooting mode.
Turn the mode dial to select one of the following modes: [

], [

], [

], [

].

9. Secure the camera.
- Once remote shooting begins, the camera lens will come out. Lens motion from zooming may also move the camera out of position. Keep the camera still by mounting it on a tripod or taking other measures.
Step 3: Connect the camera and smartphone

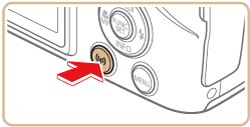
1. Press the [

] button on the camera.
NOTE
- With the default settings, the device name (
 ) is displayed.
- To change the camera’s nickname, press the [
 ], [
], [  ] buttons to choose the [Nickname] field, press the [
  ] button to display the keyboard, and then enter the desired nickname. After you have finished entering the nickname, press the [ MENU ] button to return to the registration screen, press the [
  ], [
], [  ] buttons, choose [OK], and then press the [
  ] button.
- This nickname will be displayed on [Select a Device] screen when connecting to other devices via Wi-Fi.

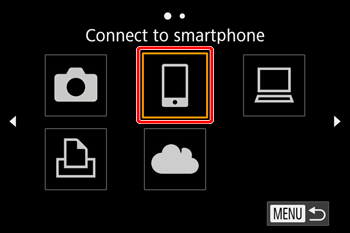
2. Press the [

], [

], [

], [

] buttons, select [

], and then press the [

] button.

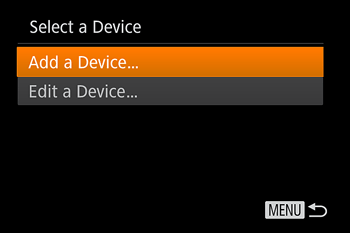
3. Press the [

], [

] buttons to select [Add a Device], and then press the [

] button.

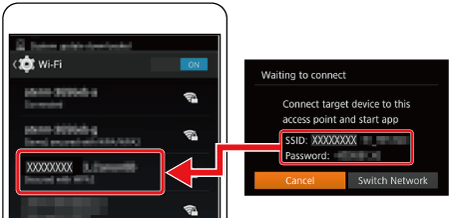
4. The camera’s SSID and password are displayed.

5. In the smartphone’s Wi-Fi setting menu, choose the SSID (network name) displayed on the camera to establish a connection. In the password field, enter the password displayed on the camera.
- Make sure that the camera and the smartphone are connected and then touch the home button to return to the home screen.

6. Touch the [Canon Connect] icon (

) on the smartphone to start [Camera Connect].
- When the screen for choosing the target camera is displayed on your smartphone, choose the camera to pair them.

7. Press the [

], [

] buttons to select [Yes], and then press the [

] button.
REFERENCE
- You can now use the smartphone to browse, import, or geotag images on the camera or shoot remotely.
- Once you have registered a smartphone, you can change the privacy settings for it on the camera.
Step 4: Use the smartphone to shoot

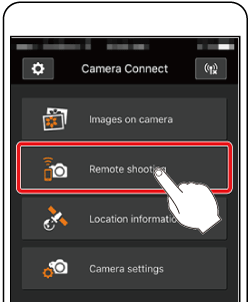
1. On the Camera Connect menu screen on the smartphone, choose [Remote Shooting].
IMPORTANT
The camera lens will come out. Do not press near the lens, and make sure no objects will obstruct it.

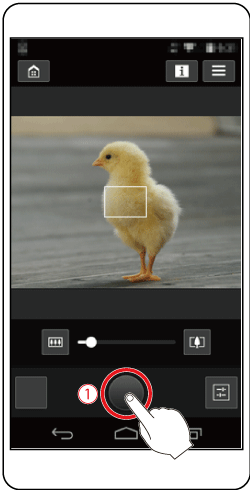
2. Once the camera is ready for remote shooting, a live image from the camera will be displayed on the smartphone. At this time, a message is displayed on the camera, and all operations except pressing the power button are disabled.

3. Use the smartphone and press

to shoot.
NOTE
- Any jerky subject motion shown on the smartphone due to the connection environment will not affect recorded images.
- Captured images are not transferred to the smartphone. Use the smartphone to browse and import images from the camera.
*Android™, and Google Play™ are trademarks of Google Inc.
 are for smartphones. The operation instructions that begin with this illustration
  are for cameras.
 ], [
], [  ],
],  ], and [
  ], the camera works in [
  ] mode. However, some [FUNC.] and [MENU] settings you have configured in advance may be changed automatically.
  ] : high, [
  ] : medium, [
  ] : low, [
  ] : weak
 : Check the OS version on your smartphone.
  : Install Camera Connect on your smartphone and turn Wi-Fi on.
 : Connect the camera and smartphone.
 : Use the smartphone to shoot.
 1. Check the smartphone’s specifications.
 )
)  [About device]
  [Android version].
 ] on the smartphone against the camera's N-Mark to make Google Play™ start automatically on the smartphone and to open the Camera Connect download screen.
 1. Touch the [Play Store] icon on your smartphone to start Google Play™.
 2. Touch the search icon.
 3. Enter "Camera Connect" as the keyword in the search field
  and then tap the search icon
  .
.
 4. Select [Camera Connect] in the search results and install it.
 5. Touch the menu key on your smartphone and then touch [Settings] (
  ).
). 6. Make sure your smartphone is not in airplane mode.
 7. Turn the [Wi-Fi] switch ON (
  ) and then tap [Wi-Fi] (
  ).
).
 8. Choose a shooting mode.
 ], [
], [  ], [
], [  ], [
], [  ].
]. 9. Secure the camera.
 1. Press the [
  ] button on the camera.
 ) is displayed.
 ], [
], [  ] buttons to choose the [Nickname] field, press the [
  ] button to display the keyboard, and then enter the desired nickname. After you have finished entering the nickname, press the [ MENU ] button to return to the registration screen, press the [
  ], [
], [  ] buttons, choose [OK], and then press the [
  ] button.
 2. Press the [
  ], [
], [  ], [
], [  ], [
], [  ] buttons, select [
  ], and then press the [
  ] button.
 3. Press the [
  ], [
], [  ] buttons to select [Add a Device], and then press the [
  ] button.
 4. The camera’s SSID and password are displayed.
 5. In the smartphone’s Wi-Fi setting menu, choose the SSID (network name) displayed on the camera to establish a connection. In the password field, enter the password displayed on the camera.
 6. Touch the [Canon Connect] icon (
  ) on the smartphone to start [Camera Connect].

 7. Press the [
  ], [
], [  ] buttons to select [Yes], and then press the [
  ] button.
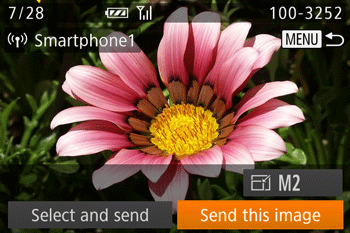
 8. The following screen is displayed when the connection with the smartphone is established.
 ] button to open the Wi-Fi menu after the first time, recent destinations will be listed first when you access the Wi-Fi menu. You can easily connect again by pressing the [
  ], [
], [  ] buttons to choose the device and then pressing the [
  ] button.To add a new device, display the device selection screen by pressing the [
  ], [
], [  ] buttons and configure the setting. If you prefer not to display recent target devices, choose [MENU] > [
  ] tab > [Wireless settings] > [Wi-Fi Settings] > [Target History] > [Off].
 1. On the Camera Connect menu screen on the smartphone, choose [Remote Shooting].
 2. Once the camera is ready for remote shooting, a live image from the camera will be displayed on the smartphone. At this time, a message is displayed on the camera, and all operations except pressing the power button are disabled.
 3. Use the smartphone and press
  to shoot.