Shooting Movies with the Default Settings (Immediately after Purchase) (EOS-1D X Mark II)

    08-Feb-2016
    8202816700

    Solution

      This article explains how to shoot movies with the default autoexposure control.
      For details on how to shoot movies when making changes to settings, refer to the related information.
      For details on shooting with manual exposure, refer to the Instruction Manual supplied with the camera.
      IMPORTANT
      • When shooting movies, use a large-capacity card with a reading/writing speed (required card performance) shown below or higher than the standard specification. Test the card by taking a few movies in the desired quality and make sure the card can properly record the movie.
      Movie Recording QualityCF CardCFast Card
      -CFast 2.0
      UDMA7
      100 MB/sec. or faster
      CFast 2.0
      UDMA7
      100 MB/sec. or faster
      CFast 2.0
      UDMA7
      60 MB/sec. or faster
      CFast 2.0
      30 MB/sec. or faster
      30 MB/sec. or faster
      10 MB/sec. or faster
      10 MB/sec. or faster

      IMPORTANT
      • If you use a slow-writing card when shooting movies, the movie may not be recorded properly. Also, if you play back a movie on a card with a slow reading speed, the movie may not play back properly.

      1. Set the camera's power switch to <ON>.

      2. Set the lens's focus mode switch to <AF>.


      3. Set the Live View shooting/Movie shooting switch to < >.
      The image will appear on the LCD monitor.

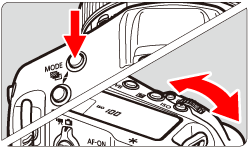
      4. Press the <MODE> button and then turn the < > or < > dial to select <P> or <bulb>.


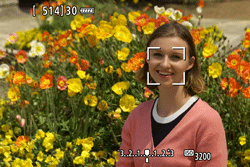
      5. The AF points will be displayed on the LCD monitor.
      • When a face is detected, [ ] will appear over the face to be focused on.
      • If multiple faces are detected, [ ] will be displayed. Use < > (the Multi-controller) to move [ ] over the face you want to focus on.


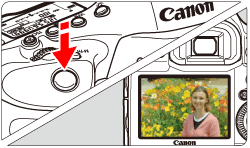
      6. Press the shutter button halfway.
      • Autofocus starts, and when focus is achieved, the AF point will turn green and the beeper will sound.
      • If focus is not achieved, the AF point will turn orange.

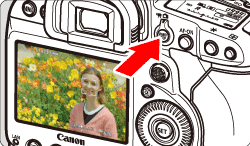
      7. Press the < > button to start shooting a movie, and press the < > again to stop shooting a movie.
       
      • While the movie is being shot, the [ ] mark will be displayed on the upper right of the screen.
      Recording movies
      Built-in microphone for movie shooting

      CAUTION
      During movie shooting, do not point the lens toward the sun. The heat of the sun may damage the camera's internal components.
      NOTE
      Recording and Image Quality
      • Movies are recorded in MOV format.
      • A movie file is created on the card each time you shoot a movie.
      - If you use the camera to format a CF card with 128 GB or less in capacity, the camera will format it in FAT32. With a FAT32-formatted CF card, if you shoot a movie and the file size exceeds 4 GB, a new movie file will be created automatically. When you play back the movie, you will have to play each movie file individually. Movie files cannot be played back automatically in consecutive order. After the movie playback ends, select the next movie to be played back.
      - If you use the camera to format a CF card with more than 128 GB in capacity, the camera will format it in exFAT. When using an exFAT-formatted card, even if the file size exceeds 4 GB during movie shooting, the movie will be saved as a single file (rather than being split into multiple files).
      • Monaural sound is recorded by the camera's built-in microphone.
      • Most external microphones equipped with a 3.5 mm diameter mini plug can be used.
      IMPORTANT
      Red [ ] Internal Temperature Warning Icon
      • If the camera's internal temperature increases due to prolonged movie shooting or under a high ambient temperature, a red [ ] icon will appear.
      • The red [ ] icon indicates that movie shooting will soon be terminated automatically. If this happens, you will not be able to shoot again until the camera's internal temperature decreases. Turn off the power and let the camera rest for a while.
      • Shooting a movie at a high temperature for a prolonged period will cause the [ ] icon to appear earlier. When you are not shooting, always turn off the camera.