Solution
You can adjust the focus using the focus ring on the lens, through the

menu, or remotely with the Browser Remote application.
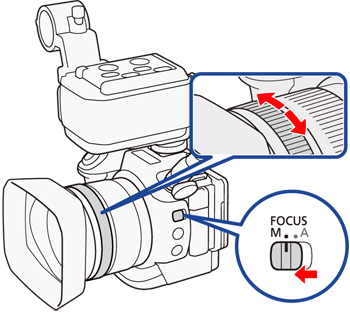
1. Set the FOCUS switch to [M].
- [MF] appears on the left side of the screen.
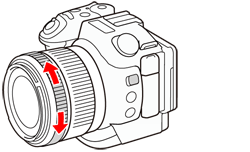
2. Turn the focus ring on the lens to adjust the focus.
- The focusing speed will depend on how fast you turn the ring.
NOTE
You can change the direction of the adjustment and the sensitivity of the response of the focus ring using the [

: Camera Setup] -> [Focus Ring Direction] and [Focus Ring Response] settings.
When the camcorder is in

mode, you must first add [

Focus] to the right side of the

menu before adjusting the focus. If you have already done so or the camcorder is in

mode, start from the second procedure, To Adjust the Focus.
1-1. Set the FOCUS switch to [M].
- [MF] appears on the left side of the screen.
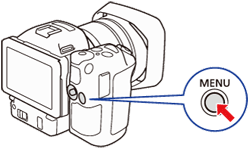
1-2. Press the [ MENU ] button.
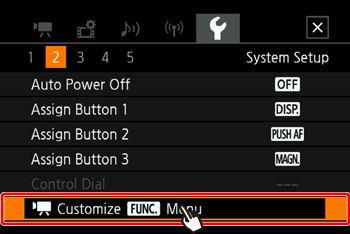
1-3. Touch [

: System Setup ] -> [

Customize

].
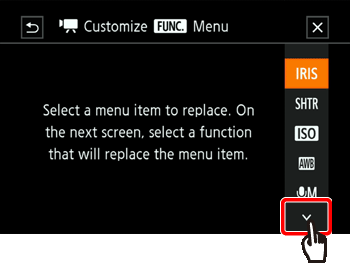
1-4. Touch [

].
1-5. Touch [

: Focus ].
1-6. Touch [

].
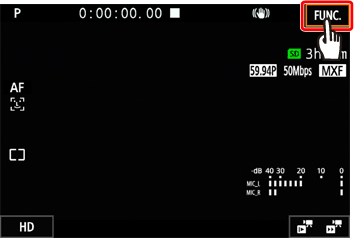
2-1. Touch [

].
2-2. Touch [

: Focus ].
2-3. Touch a subject that appears inside the white frame.
- The [
 ] mark will flash on the selected subject or area and the camcorder will automatically focus where the mark is. After that, the camcorder will return to [MF] mode.
Remote Operation Using Browser Remote
After completing the necessary preparations, you can adjust the focus remotely from a connected device using the Browser Remote application. In this procedure, depending on the network device, you may need to click the Browser Remote onscreen button instead of touching it.
1. If the camcorder is set to AF mode, touch [MF] on the Browser Remote screen.
- The gray line in the button will turn orange and the camcorder will change to manual focus mode.
2. Touch one of the [FOCUS] controls to adjust the focus as necessary.
- Touch one of the controls on the [NEAR] side (
 ) to focus closer or one of the controls on the [FAR] side (
 ) to focus farther away.
- There are three levels of adjustment -[
 ] is the smallest and [
  ] the largest.
IMPORTANT
- Using the subject distance display on the screen :
- When you use the focus ring, the approximate subject distance is displayed for a few seconds.
- Use the subject distance display as an estimate.
- [∞] indicates infinity focus.
- You can change the units of distance between meters and feet using the [

: System Setup* ] -> [Distance Units] setting (in

mode).
* In

mode is [

: System Setup ]
NOTE
- If you operate the zoom after focusing, the focus on the subject may be lost.
- If you focus manually and then leave the camcorder with the power turned on, the focus on the subject may be lost after a while. This possible slight shift in focus is a result of the internal temperature rising in the camcorder and lens. Check the focus before resuming shooting.
Using the Focus Assistance Functions
In order to focus more accurately, you can use two focus assistance functions – peaking, which creates a clearer contrast by emphasizing the outlines of the subject, and magnification, which enlarges the image on the screen.
You can use both functions simultaneously for greater effect.
IMPORTANT
When peaking is activated, the edges of objects in focus will be highlighted in red, blue or yellow on the screen. In addition, you can choose to switch the screen to black & white, further emphasizing the edges.
1. Touch [

].
2. Touch [

: Peaking ].
3. Touch [

On].
- Peaking is activated and edges are highlighted.
NOTE
- Touch [
 Off ] to turn off the peaking effect.
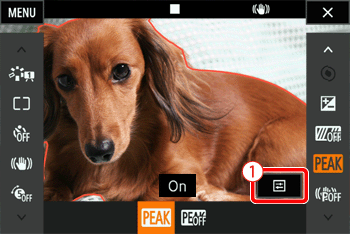
4. Touch [

] (

).
5. To change the peaking settings.
- For the black & white setting : Touch [Off] or [On]
- For the peaking color : Touch [Red], [Blue] or [Yellow]
6. Touch [

].
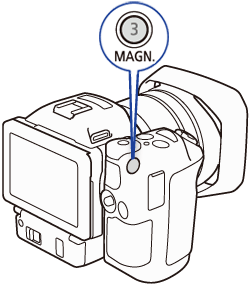
1. Press the [ MAGN.] button.
NOTE
- Alternatively, you can use the [FUNC.] -> [
 : Magnification ] -> [ OK ] setting after you add the function to the [FUNC.] menu.
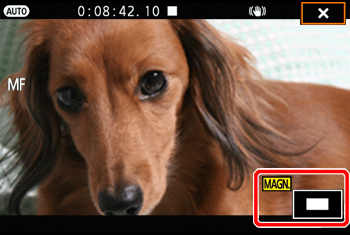
2. [

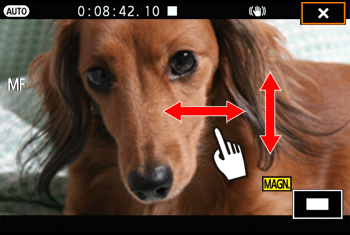
] will appear on the bottom right of the screen and the center of the screen is magnified approximately 2 times*.
* The magnification that appears on the screen differs based on the video configuration.
REFERENCE
- A white frame representing the whole screen area is displayed on the bottom right of the screen. The white rectangle within it represents the approximate part of the image shown magnified.
3. If necessary, use the joystick (


) or drag your finger across the screen to move the white rectangle around and check other parts of the image.
4. Press the [MAGN.] button again or touch [

] to cancel the magnification.
NOTE
- Peaking / Magnification appears only on the camcorder screen. It will not appear on an external monitor connected to the camcorder and will not affect your recordings.
- You cannot use magnification while color bars are displayed on the screen.
- Activating magnification while the waveform monitor is on the screen will deactivate the waveform monitor.
 menu, or remotely with the Browser Remote application.


 : Camera Setup] -> [Focus Ring Direction] and [Focus Ring Response] settings.
 mode, you must first add [
  Focus] to the right side of the
  menu before adjusting the focus. If you have already done so or the camcorder is in
  mode, start from the second procedure, To Adjust the Focus.

 : System Setup ] -> [
  Customize
  ].
].
 ].
].
 : Focus ].
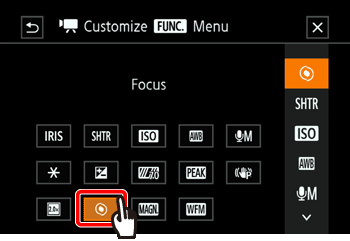
 ].
]. ].
].
 : Focus ].
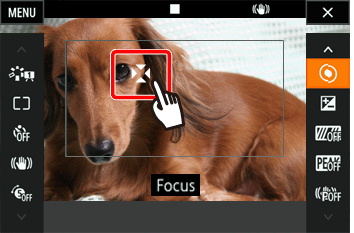
 ] mark will flash on the selected subject or area and the camcorder will automatically focus where the mark is. After that, the camcorder will return to [MF] mode.

 ) to focus closer or one of the controls on the [FAR] side (
 ) to focus farther away.
 ] is the smallest and [
  ] the largest.
 : System Setup* ] -> [Distance Units] setting (in
  mode).
 mode is [
  : System Setup ]
 ].
].
 : Peaking ].
 On].
On].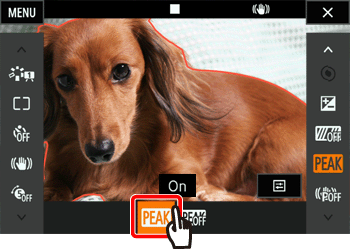
 Off ] to turn off the peaking effect.
 ] (
] ( ).
).

 ].
].
 : Magnification ] -> [ OK ] setting after you add the function to the [FUNC.] menu.
 ] will appear on the bottom right of the screen and the center of the screen is magnified approximately 2 times*.

 ) or drag your finger across the screen to move the white rectangle around and check other parts of the image.
 ] to cancel the magnification.