Using GPS Information (Map Utility 1.5)
Solution
Using geotagged images and GPS logs, you can easily see on a map where shots were taken and view the route traveled with the camera.
It is also easy to add or delete location information.
IMPORTANT
- The operations described here assume that the ImageBrowser EX software from the supplied CD (DIGITAL CAMERA Solution Disk) has been installed, and has been updated over the Internet.
- If there is no [ImageBrowser EX] on the supplied CD, you can download and install the [ImageBrowser EX] updater from the downloads section of the Canon Web site. Please note that you will need to have your camera ready when you do the installation.
- In this section, Windows 7 is used as an example. Depending on the operating system you are using, on-screen displays and operations may differ slightly.
- Uploading requires Internet access. You must have an account with an Internet service provider, a browser must be installed, and an Internet connection must be established.
- As with ordinary Internet access, ISP connection or access fees may apply.
- Google, Google Maps, and Google Earth are trademarks of Google Inc.
- This program uses Google Maps to display image locations and routes traveled on a map. Location information in images and GPS logs is sent to service providers.
- Geotagged shots and GPS logs may contain personally identifiable information. Be careful when sharing the files or posting images online where many people can view them.
- Only images taken on a camera equipped with an internal GPS function can be displayed.
- Do not use Map Utility with images you are currently editing in Digital Photo Professional. This may prevent your changes from being saved correctly.
If [ImageBrowser EX] is installed on your computer, you can simultaneously select multiple images that you want to display on a map.
1. Double-click the [ImageBrowser EX] shortcut icon on your desktop to start [ImageBrowser EX].

REFERENCE
- If you cannot find the [ImageBrowser EX] shortcut icon on your desktop, click [Start] > [All Programs] or [Programs] > [Canon Utilities] > [ImageBrowser EX] and select [ImageBrowser EX] to start [ImageBrowser EX].
- On a Mac, click the [ImageBrowser EX] icon on the [Dock]. If no [ImageBrowser EX] icon is found on the [Dock], click [Go] on the menu bar, select [Applications], and then open [Canon Utility] > [ImageBrowser EX], and then select and start [ImageBrowser EX].
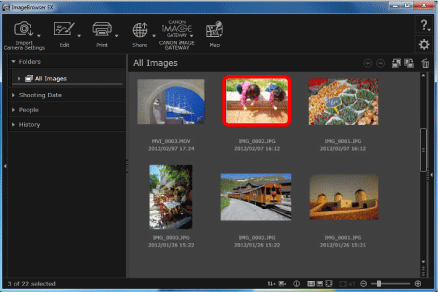
2. The following screen will appear, so click the images you want to display on a map to select them.
NOTE
- To select multiple images, click the images while holding down the <Ctrl>* key on the keyboard.
* In Mac OS X, hold down the <Command> key while clicking images.
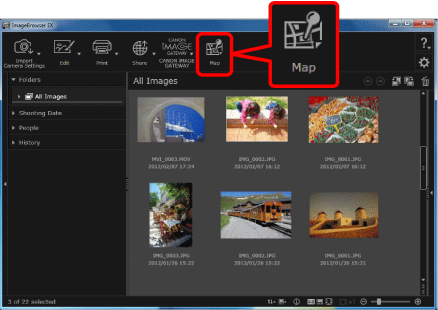
3. If you click [Map], [Map Utility] will start.
For details on Map Utility’s on-screen displays, please see here.
If you want to display images without using [ImageBrowser EX], start [Map Utility] directly.
1. Click [Start] > [All Programs] or [Programs] > [Canon Utilities] and select [Map Utility] to start [Map Utility].
REFERENCE
- If using Mac OS X
Click [Go] in the menu bar, select [Applications] -> [Canon Utilities] -> [Map Utility], and then click [Map Utility] to start the software.
2. The following window appears.

A window like the one below appears when [Map Utility] is running.
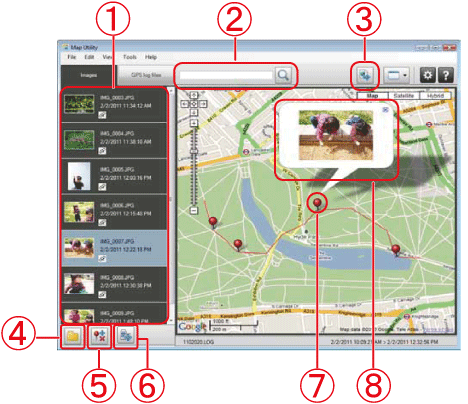
 The image selected in [ImageBrowser EX] or added by clicking the (
 ) button appears.
 Enter a location to find corresponding images.
 Click to export location files that can be viewed in Google Earth. (Use of these files requires Google Earth to be installed. Note that display may be incorrect in some versions of Google Earth.)
 Add images.
 Add or remove image location information.
 Label images in the current map area with landmark names.
 Shooting locations are indicated by pins on the map.
 The current image is shown in a pop-up window.
REFERENCE
[Managing GPS logs]
If you want to manage GPS log files, click [GPS Log File].
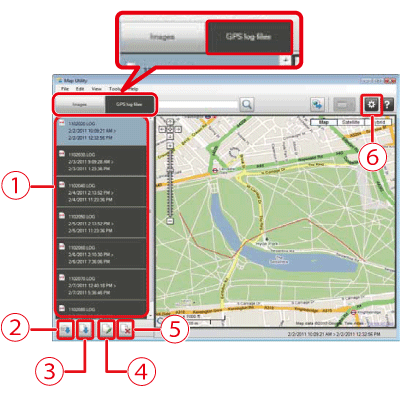
 Lists GPS log files.
 Import GPS log files from a camera or memory card.
 Add a GPS log file.
 Change GPS log time difference information.
 Remove a GPS log file from the list.
 Click to filter log information display. Adjust display conditions as needed for a better view of the route on the map.


