Changing the Number of Recording Pixels (IXUS 185 / IXUS 190)
Solution
You can shoose the image’s number of recording pixels from 5 levels.
IMPORTANT
The procedure is shown on an IXUS 185 for the purposes of explanation. The position and shape of the operation buttons, screens displayed, and setting items may differ according to the model you use.
The procedure for changing the recording pixels is explained below.
1. Turn the camera on.
2. If [Easy Auto enabled] message is displayed, follow the instructions on the screen to disable Easy Auto.
If you prefer, you can deactivate this message by changing the Easy Auto settings. For details refer to "Related information" section at the end of the page.
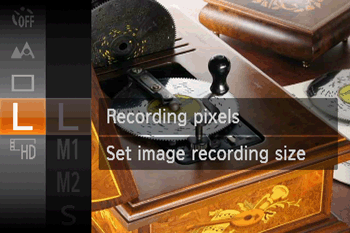
3. Press the [  ] button to display the menu items, and then press the [
  ] , [
] , [  ] buttons to select [Recording pixels].
] button to display the menu items, and then press the [ ] , [ ] buttons to select [Recording pixels].
NOTE
- If the default settings have not been changed, [L] is displayed. If the recording pixels have been changed, the changed setting is displayed.
4. Press the [  ] button to access the setting screen, press the [ ], [ ] buttons to select the recording pixels, and then press the [ ] button.
] button to access the setting screen, press the [ ], [ ] buttons to select the recording pixels, and then press the [ ] button.

The recording pixels can be changed in the shooting modes shown in the table below.
| Recording Pixels | Shooting Mode |
 / /  / /  / /  / /  |  / /  / /  / /  / /  / /  |
 (Fix) (Fix) |  *1 / *1 /  |
| (Fix) |  / /  / /  / /  / /  |
| / |  |